diamondmeals.com

Healthy Meals

almond flour tortillas

Almond Flour Tortillas: A Soft, Low-Carb Wrap You Can Make at Home

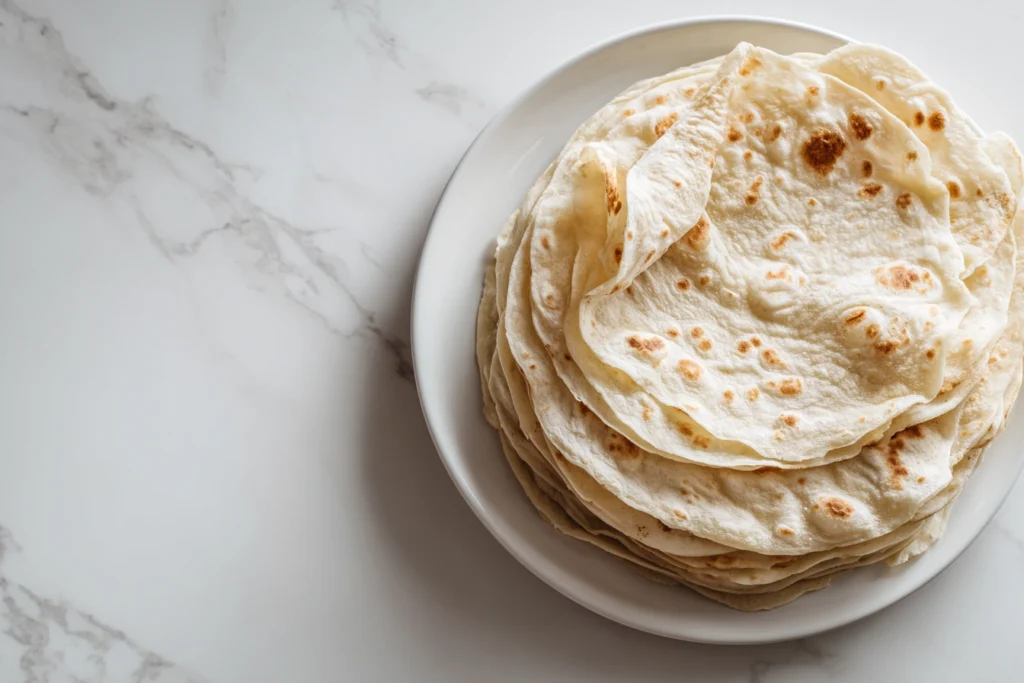
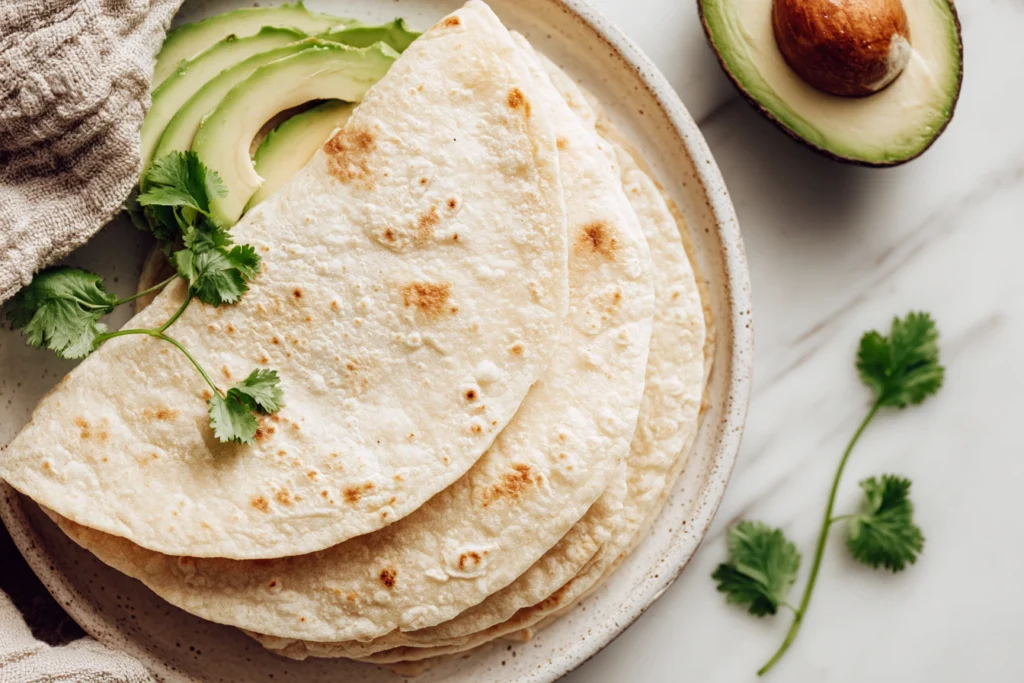
Homemade wraps have become increasingly popular as more people look for healthier alternatives to traditional bread. One recipe that stands out for its simplicity and versatility is almond flour tortillas. These gluten-free wraps are soft, flexible, and easy to prepare with only a few ingredients, making them ideal for busy kitchens. Whether you want a light lunch option or a nourishing base for tacos and wraps, learning to make almond flour tortillas at home can completely change your meal routine. Unlike classic wheat tortillas, this recipe focuses on wholesome ingredients that provide texture without relying on gluten. The result is a tender wrap that can be folded, rolled, or filled without breaking, giving you endless creative possibilities. Why Homemade Gluten-Free Wraps Are Trending Many home cooks are moving toward recipes that balance taste and nutrition. The popularity of almond flour tortillas comes from their ability to offer a soft texture while remaining naturally grain-free. They fit easily into keto, low-carb, and gluten-free lifestyles, which makes them appealing to a wide audience. Another reason for their growing popularity is how easy they are to customize. Some people prefer adding herbs or spices, while others keep the recipe minimal. No matter the variation, almond flour tortillas remain a reliable base that adapts to many flavors and cuisines. The Role of Almond Flour in This Recipe Almond flour is made from finely ground almonds and has a mild, slightly nutty taste. Its natural fats help create a moist dough that stays tender even after cooking. Because it lacks gluten, a binder such as psyllium husk is often used to give structure and flexibility to almond flour tortillas. One of the advantages of almond flour is its ability to produce wraps that feel satisfying without being heavy. Many people enjoy how almond flour tortillas provide a balanced texture that works equally well for savory fillings or lighter meals. Ingredients You Will Need The beauty of this recipe is its simplicity. Most versions of almond flour tortillas rely on only a few pantry staples, which makes them convenient for everyday cooking. Ingredients: These ingredients combine to form a soft dough that holds together without traditional flour. The psyllium absorbs moisture and helps ensure that almond flour tortillas remain flexible once cooked. Step-by-Step Instructions Preparing this recipe is straightforward, even if you’ve never worked with gluten-free dough before. Follow these steps to create perfectly soft almond flour tortillas. Step 1: Mix the Dry Ingredients In a mixing bowl, combine the almond flour, psyllium husk, and salt. Stir well so everything is evenly distributed. This helps prevent uneven texture later in the process. Step 2: Add the Liquid Pour the warm water into the bowl while stirring continuously. Within seconds, the mixture will thicken into a dough. Allow it to rest for about five minutes so the psyllium can fully hydrate, which is essential for shaping almond flour tortillas. Step 3: Shape the Dough Divide the dough into small portions and roll each piece into a ball. Place one ball between parchment sheets and flatten it into a thin circle. Rolling gently ensures that almond flour tortillas stay smooth and even. Step 4: Cook in a Skillet Heat a nonstick pan over medium heat. Cook each tortilla for one to two minutes per side until light golden spots appear. As they cook, you’ll notice how almond flour tortillas develop a soft yet sturdy texture. Helpful Tips for Success Working with almond flour requires a slightly different approach than traditional baking. These tips will help you achieve consistent results when making almond flour tortillas. With practice, shaping almond flour tortillas becomes quick and intuitive. If you enjoy simple low-carb baking, you might also love our creamy and satisfying avocado bread recipe, perfect for a healthy everyday meal. Taste and Texture Many people are pleasantly surprised by how soft and satisfying these wraps can be. The texture of almond flour tortillas is slightly more tender than wheat tortillas, with a mild nutty flavor that pairs beautifully with a variety of fillings. Because almond flour contains natural fats, the tortillas feel rich without needing extra oil. This makes almond flour tortillas a favorite choice for people looking for balanced meals that still feel indulgent. Looking for another high-protein comfort idea? Try our flavorful protein pizza, a delicious option that fits perfectly into a balanced lifestyle. Nutrition Highlights Although nutrition values vary depending on portion size, almond flour tortillas are often lower in carbohydrates compared to traditional versions. They typically contain healthy fats, moderate protein, and fiber, which contribute to a feeling of fullness. Many home cooks appreciate how almond flour tortillas support mindful eating habits while still tasting delicious. They provide an option that feels wholesome without sacrificing flavor or texture. For more light and flexible meal ideas, explore our collection of low-carb wraps, designed for quick lunches and nourishing dinners. Serving Ideas One of the reasons people enjoy making almond flour tortillas is their versatility. You can use them in countless recipes throughout the week. Here are a few creative ideas: No matter how you serve them, almond flour tortillas adapt easily to different cuisines and flavors. Flavor Variations Once you master the basic recipe, you can experiment with small changes to create new versions of almond flour tortillas. Herb Blend: Add dried oregano or basil for a savory twist.Spicy Touch: Mix in paprika or chili flakes for warmth.Richer Texture: Add a teaspoon of olive oil to the dough for extra softness. These variations allow you to personalize almond flour tortillas based on your preferences. Storage and Meal Prep Tips Homemade wraps are convenient to prepare in advance. Store cooked almond flour tortillas in an airtight container in the refrigerator for several days. For longer storage, place parchment paper between each tortilla and freeze them. When reheating, warm the tortillas gently in a skillet or microwave to restore flexibility. Proper storage ensures that almond flour tortillas stay soft and ready whenever you need them. Final Thoughts Making your

Almond Flour Tortillas: A Soft, Low-Carb Wrap You Can Make at Home Read More »

Avocado Bread

Avocado Bread: The Ultimate Soft, Healthy, and Easy Homemade Recipe

If you love baking simple yet nourishing recipes, avocado bread is a delicious trend worth trying. This soft and flavorful loaf uses ripe avocado to create a moist texture without relying on large amounts of butter or oil. The result is a balanced recipe that feels comforting while still modern and light. Many home bakers are turning to avocado bread because it combines minimal ingredients with impressive results. Whether served for breakfast, lunch, or a quick snack, this versatile loaf adapts easily to different flavors. Once you learn how to prepare avocado bread at home, you’ll discover just how simple and satisfying it can be. What Is Avocado Bread? Avocado bread is a soft baked recipe made by incorporating mashed avocado into a dough or batter. The avocado provides natural richness, helping the bread stay tender and moist. Unlike traditional recipes that depend heavily on butter, avocado bread uses the creamy texture of fresh avocado as a key ingredient. Some versions of avocado bread are savory and protein-rich, while others are slightly sweet and similar to classic quick breads. Regardless of the variation, the goal remains the same: creating a soft loaf with a unique texture and subtle flavor. Because avocadoo bread can be prepared quickly, it has become popular among people looking for healthier homemade alternatives. The recipe works well for beginners since it doesn’t require complicated techniques or long rising times. Ingredients Needed for Avocado Bread The beauty of avocado bread lies in its simplicity. A basic recipe requires only a few ingredients that come together to create a surprisingly flavorful result. Main Ingredients These three elements form the foundation of a simple avocado bread. The avocado adds moisture, the egg helps bind everything together, and the cheese provides structure during baking. Optional Seasonings Adding seasoning allows you to personalize the taste of your avocado bread without changing the overall texture. How to Make Avocado Bread Step by Step Step 1: Mash the Avocado Start by cutting a ripe avocado in half and removing the pit. Scoop the flesh into a bowl and mash it thoroughly until smooth. A creamy consistency ensures the avocado bread will bake evenly. Step 2: Mix the Ingredients Add the egg and shredded cheese to the mashed avocado. Stir gently until the mixture becomes thick and uniform. Avoid overmixing, as this can make the avocado bread dense. Step 3: Shape the Portions Line a baking tray with parchment paper. Spoon the mixture onto the tray and flatten it slightly to form small rounds. Thin shapes help the avocado bread cook faster and develop a golden edge. Step 4: Bake Preheat your oven to 200°C. Bake the portions for about 20 minutes, or until the tops become lightly golden and firm to the touch. Step 5: Cool and Enjoy Allow the avocado bread to cool for a few minutes before serving. Cooling helps the structure set, making each piece easier to handle. Looking for another high-protein comfort recipe? Try our protein pizza for a satisfying and balanced homemade option. Why Avocado Bread Has Such a Moist Texture One of the main reasons avocado bread feels so soft is the natural fat content of avocado. These fats help lock in moisture while giving the bread a tender crumb. Eggs provide stability, while cheese adds a slightly chewy consistency that balances the softness. Unlike traditional baking methods that rely on large amounts of oil, avocado bread achieves its richness naturally. This combination creates a texture that is both light and satisfying. If you love easy low-carb baking, don’t miss our soft and flexible low-carb wraps, ideal for quick healthy meals. Tips for Perfect Avocado Bread Every Time Choose a Perfectly Ripe Avocado The success of avocadoo bread depends heavily on the quality of the avocado. It should feel slightly soft but not overly mushy. Keep the Mixture Balanced Too much avocado can make the bread overly soft, while too little may reduce moisture. Maintaining the right ratio ensures the avocadoo bread holds together well. Use Parchment Paper Since avocado bread contains natural oils, parchment paper prevents sticking and makes cleanup easier. Bake at the Right Temperature A hot oven helps create a golden exterior while keeping the inside soft and tender. For a creamy, flavorful pairing idea, you might also enjoy our cottage cheese spinach artichoke dip — a perfect match for savory recipes. Sweet vs. Savory Avocado Bread Variations One of the best features of avocadoo bread is how adaptable it is. You can easily transform the recipe depending on your taste preferences. Sweet Avocado Bread To create a sweeter version, add a small amount of sugar, vanilla extract, or chocolate chips. This style of avocadoo bread works well for breakfast or dessert and pairs beautifully with coffee. Savory Avocado Bread The savory version focuses on herbs, cheese, and spices. Many people enjoy avocadoo bread as a base for sandwiches or topped with eggs and vegetables. Adding seeds or grated parmesan can enhance both flavor and texture. Experimenting with different ingredients allows you to create a unique avocadoo bread every time you bake. Health Benefits of Avocado Bread Avocadoo bread is often chosen by those who want a more nourishing baked option. Avocados contain natural fats that help create a satisfying texture, while eggs add protein and structure. Because many avocadoo bread recipes use simple ingredients, they can feel lighter than traditional bread. The combination of healthy fats and protein helps make avocadoo bread filling, making it a practical choice for busy mornings or quick meals. Serving Ideas for Avocado Bread There are many creative ways to enjoy avocadoo bread once it’s baked: Because avocadoo bread has a mild flavor, it pairs easily with both fresh and savory toppings. Storage and Reheating Tips If you have leftover avocadoo bread, proper storage helps maintain its texture. Place cooled pieces in an airtight container and refrigerate for up to four days. Reheat gently in the oven or toaster to restore the crisp edges. For longer storage,

Avocado Bread: The Ultimate Soft, Healthy, and Easy Homemade Recipe Read More »

protein pizza

Protein Pizza Recipe: 7 Powerful Secrets for the Best High-Protein Chicken Crust

If you love pizza but want something lighter and more nourishing, this protein pizza recipe offers a delicious alternative. Instead of using a traditional flour dough, this version features a savory chicken-based crust that delivers flavor, structure, and impressive protein content. A well-made protein pizza keeps the comforting essence of classic pizza while supporting balanced eating habits and modern nutrition goals. Many home cooks are turning toward creative high-protein meals that feel satisfying without being heavy. A protein pizza achieves that balance by combining simple ingredients with smart cooking techniques. The result is a crispy, cheesy dish that feels indulgent while still aligning with a more mindful lifestyle. Why Protein Pizza Is Becoming a Favorite Choice The popularity of protein pizza continues to grow because it blends convenience with nutritional benefits. Unlike traditional dough recipes that require time for rising and shaping, this crust comes together quickly using ground chicken, egg, cheese, and seasoning. This streamlined preparation makes protein pizza an appealing option for busy weeknights or quick meal prep. Another reason people love protein pizza is its versatility. You can adjust flavors, toppings, and seasonings to suit your preferences. Some prefer a classic tomato and mozzarella combination, while others enjoy bold spices, fresh herbs, or roasted vegetables. Regardless of how you customize it, the core idea of protein pizza remains the same: a satisfying dish that prioritizes protein without sacrificing taste. Ingredients for a Flavorful Protein Pizza Chicken Crust Base The combination of egg and cheese helps the chicken form a cohesive crust, while the seasoning creates a familiar pizza aroma. Toppings Choosing balanced toppings helps maintain the structure of your protein pizza while enhancing flavor. Step-by-Step Instructions for Protein Pizza Prepare the Chicken Mixture In a large bowl, combine ground chicken, egg, Parmesan cheese, mozzarella, and seasonings. Mix until fully combined. The texture should be smooth and slightly sticky, allowing you to spread it easily onto parchment paper. Shape the Crust Line a baking sheet with parchment paper. Spread the mixture into a thin round or rectangle, about a quarter-inch thick. Keeping the crust thin ensures that the protein pizza cooks evenly and develops a firm texture. Pre-Bake the Crust Preheat the oven to 400–425°F (200–220°C). Bake the crust alone for about 20 minutes until it becomes lightly golden and firm. Pre-baking is essential for any protein pizza because it prevents the base from becoming soggy once toppings are added. Allow the crust to rest briefly before moving to the next step. Add Sauce and Toppings Spread a thin layer of pizza sauce across the surface. Add mozzarella and your chosen toppings evenly. Avoid overloading the pizza, as excess moisture can soften the crust. Final Bake Return the protein pizza to the oven and bake for another 8–12 minutes until the cheese melts and bubbles. For extra color, broil briefly at the end while watching closely. For a bold and flavorful appetizer, don’t miss our cottage cheese buffalo chicken dip, packed with protein and rich savory taste. Tips to Make the Best Protein Pizza Every Time Use ground chicken with moderate fat content.This helps keep the crust moist and flavorful. Press the mixture evenly.Uniform thickness prevents uneven cooking. Bake long enough during the first stage.A properly cooked base ensures that your protein pizza slices cleanly. Keep toppings light.Too much sauce or cheese may weigh down the crust. Rest before slicing.Allowing the pizza to cool slightly helps it firm up. Looking for another low-carb idea to pair with your meal? Try our soft and flexible low carb wraps for a simple, satisfying option. Nutritional Benefits of Protein Pizza One of the biggest advantages of protein pizza is its nutritional profile. Because the crust relies on chicken instead of refined flour, each slice delivers more protein while reducing carbohydrates. This balance makes protein pizza a popular option for people who want meals that feel filling yet lighter. Protein-rich dishes can help maintain energy levels and support satiety. Adding vegetables as toppings increases fiber and micronutrients, transforming a simple pizza into a more complete meal. For many households, protein pizza has become a practical way to enjoy comfort food while staying mindful of nutrition. If you enjoy high-protein comfort foods, you may also love our creamy cottage cheese spinach artichoke dip — a lighter twist on a classic favorite. Creative Protein Pizza Variations Once you master the basic method, you can explore endless variations of protein pizza: Mediterranean Style Add olives, cherry tomatoes, and feta cheese for a fresh and savory twist. Spicy BBQ Version Use barbecue sauce and top with red onions and jalapeños for bold flavor. Veggie Lover’s Pizza Roasted zucchini, spinach, and mushrooms create a colorful and nutrient-rich option. White Garlic Protein Pizza Replace tomato sauce with a garlic yogurt or ricotta base and finish with herbs. Each variation keeps the same protein-rich crust while offering a new flavor experience. Common Mistakes to Avoid Even though protein pizza is simple to prepare, a few common errors can affect the final result: By avoiding these mistakes, your protein pizza will maintain the perfect balance between crispness and tenderness. Serving Suggestions for Protein Pizza Protein pizza is incredibly versatile when it comes to serving. Pair it with a fresh green salad or roasted vegetables for a balanced meal. It also works well as a high-protein lunch option or as part of a casual gathering with friends. Some people like cutting protein pizza into small squares and serving it as an appetizer. The golden edges and melted cheese create a presentation that looks just as appealing as traditional pizza. Storage and Reheating Tips Store leftover slices in an airtight container in the refrigerator for up to three days. Reheat in an oven or air fryer to maintain the crisp texture. You can also freeze a pre-baked crust without toppings and finish baking it later for a quick meal. Frequently Asked Questions Which pizza has the most protein?A protein pizza made with a chicken or high-protein crust usually contains the most

Protein Pizza Recipe: 7 Powerful Secrets for the Best High-Protein Chicken Crust Read More »

Horse Salt Trick

Horse Salt Trick: The Viral Kitchen Method Explained With Origins, Uses, and Practical Tips

The Horse Salt Trick has become a fascinating topic across modern food culture and online discussions. Although the name sounds unusual, the idea behind the Horse Salt Trick is surprisingly simple: using salt strategically to enhance flavor, improve texture, and create a more balanced culinary experience. Many people encounter the Horse Salt Trick through viral trends, yet its roots are connected to traditional practices that have existed for generations. In this guide, we explore the background of the Horse Salt Trick, why it gained popularity, and how it can be applied responsibly in everyday cooking. Understanding the story behind the Horse Salt Trick allows you to appreciate it as more than just a trend — it becomes a technique grounded in observation and simplicity. What Is the Horse Salt ? The Horse Salt refers to a seasoning approach inspired by traditional farm methods where salt was used carefully to influence hydration and appetite. In modern kitchens, the Horse Salt Trick describes adding a small amount of salt at the right moment to enhance natural flavors rather than overpower them. Unlike complicated culinary techniques, the Horse Salt Trick focuses on timing and balance. Many cooks interpret it as a reminder that a single ingredient, when used correctly, can transform an entire dish. The popularity of the Horse Salt Trick comes from this minimalist philosophy, which fits perfectly with current trends toward simple and authentic cooking. The Origins Behind the Horse Salt Trick Historically, salt played a vital role in farming communities. Caretakers often used mineral salts to maintain animal health, which eventually inspired creative interpretations in food culture. The phrase Horse Salt emerged as a way to describe these traditional ideas in a memorable and engaging way. Over time, writers and chefs adopted the term to describe bold seasoning strategies. Instead of viewing salt as just a basic ingredient, the Horse Salt Trick reframes it as a powerful culinary tool. The story behind the Horse Salt Trick adds a sense of authenticity that appeals to audiences searching for rustic inspiration. Why the Horse Salt Trick Became a Trend The rise of the Horse Salt Trick can be linked to several modern influences. First, people are increasingly interested in techniques that feel natural and accessible. Second, social media platforms often highlight unusual names or unexpected ideas, making the Horse Salt Trick stand out among other cooking trends. Another reason for its popularity is curiosity. The phrase itself invites questions, encouraging readers to explore what makes the Horse Salt Trick different from ordinary seasoning methods. As a result, the concept spread quickly among food bloggers and home cooks looking for fresh inspiration. How the Horse Salt Trick Enhances Flavor Salt is essential in cooking because it amplifies taste without adding complexity. The Horse Salt focuses on using salt at precise stages of preparation to achieve the best results. Strategic Timing Instead of adding salt all at once, many cooks who follow the Horse Salt Trick recommend seasoning in layers. For example: This layered approach allows the Horse Salt Trick to enhance both texture and aroma. Balancing Sweet and Savory One of the most interesting aspects of the Horse Salt Trick is its ability to balance sweetness. Even desserts can benefit from a tiny amount of salt, which intensifies flavor and prevents recipes from tasting overly sugary. “And if you want to discover a more traditional mineral approach, don’t miss our Celtic salt technique explained step by step.” The Horse Salt Trick in Modern Recipes Today, the Horse Salt appears in a variety of culinary styles. Some cooks use it when preparing roasted vegetables, while others incorporate it into refreshing drinks or baked goods. The versatility of the Horse Salt Trick makes it appealing for both beginners and experienced chefs. Popular interpretations include: Each variation shows how the Horse Salt Trick adapts easily to different cuisines and preferences. “For another simple wellness-inspired idea, take a look at our popular gelatin trick method that many readers find surprisingly practical.” Misconceptions About the Horse Salt Trick As with many viral ideas, the Horse Salt is sometimes misunderstood. Clearing up these misconceptions helps keep the technique grounded in realistic expectations. It Is Not a Magic Formula Some people assume the Horse Salt Trick provides instant results or dramatic changes. In reality, it is simply a method of seasoning thoughtfully. More Salt Is Not Better The essence of the Horse Salt Trick lies in restraint. Using too much salt can overwhelm a dish and mask its natural flavors. It Is Not Limited to One Type of Recipe Although the name suggests a specific origin, the Horse Salt Trick can be applied to a wide range of dishes, from simple snacks to elegant meals. Scientific Perspective on Salt Usage From a culinary science viewpoint, salt interacts with food in several ways. It draws out moisture, enhances aroma, and modifies texture. The Horse Salt uses these properties intentionally, encouraging cooks to pay attention to how salt behaves during preparation. Experts often emphasize that most diets already contain sufficient sodium, so moderation remains important. Viewing the Horse Salt Trick as a flavor technique rather than a health shortcut helps maintain balance. “If you’re curious about how mineral salts interact with fasting, you may also enjoy exploring our detailed pink salt fasting guide.” A Simple Recipe Inspired by the Horse Salt Trick If you want to experiment with the Horse Salt , try this refreshing citrus drink that demonstrates how a small pinch of salt can elevate flavor. Citrus Balance Refresh Ingredients Steps This recipe captures the spirit of the Horse Salt by focusing on subtle enhancement rather than strong seasoning. Cultural Appeal of the Horse Salt Trick Part of the charm of the Horse Salt lies in its storytelling. People enjoy techniques that connect modern kitchens to traditional practices. The name itself creates curiosity, while the simplicity of the method makes it easy to remember. As food culture evolves, the Horse Salt Trick continues to inspire creative adaptations. Some cooks

Horse Salt Trick: The Viral Kitchen Method Explained With Origins, Uses, and Practical Tips Read More »

apple cider vinegar weight loss

Apple Cider Vinegar Weight Loss: Medical Facts, Benefits, and Healthy Ways to Use It

The idea of apple cider vinegar weight loss has become extremely popular among people looking for natural ways to improve their health. Many wellness trends promise fast results, but understanding the real science behind apple cider vinegar is essential before adding it to a daily routine. While it is not a miracle solution, research suggests that vinegar may support metabolic health when used correctly alongside balanced nutrition. This guide explores the medical facts behind apple cider vinegar weight loss, explains how it may work in the body, and shares practical recipes that make it easy to include in a healthy lifestyle. What Is Apple Cider Vinegar? Apple cider vinegar is produced through a fermentation process that transforms natural apple sugars into acetic acid. This compound gives vinegar its sharp flavor and is believed to play a key role in many of the metabolic effects associated with apple cider vinegar weight loss. Because it contains very few calories, it is often used by people who want to reduce overall energy intake without sacrificing flavor. Unlike sugary drinks or high-calorie sauces, apple cider vinegar adds acidity and brightness to meals without increasing calorie load. This makes it appealing for individuals trying to create healthier eating habits. Does Apple Cider Vinegar Weight Loss Really Work? Many people wonder whether apple cider vinegar weight loss is supported by scientific evidence or simply driven by online trends. Clinical research suggests that vinegar may lead to modest reductions in body weight and waist measurements over time. However, these changes are generally small and depend heavily on overall diet and lifestyle. Experts emphasize that vinegar should be viewed as a supportive tool rather than a primary treatment. The success of apple cider vinegar weight loss usually depends on combining it with mindful eating, physical activity, and consistent habits. How Apple Cider Vinegar May Influence Weight Management Appetite and Satiety Some studies indicate that vinegar may increase feelings of fullness after meals. By promoting satiety, apple cider vinegar weight loss strategies may help reduce daily calorie intake without strict dieting. This effect may be linked to slower gastric emptying, which allows food to remain in the stomach slightly longer. However, appetite responses vary, and not everyone experiences the same level of fullness. Blood Sugar Regulation One of the most consistent findings related to apple cider vinegar weight loss is its potential influence on blood sugar balance. Vinegar appears to reduce post-meal glucose spikes, which may help stabilize energy levels and decrease cravings for sugary snacks. Stable blood sugar can indirectly support weight management by preventing rapid hunger cycles. Fat Metabolism Support Acetic acid may influence enzymes that regulate fat storage. While human research is still evolving, some evidence suggests that apple cider vinegar weight loss effects could involve improved metabolic efficiency rather than direct fat burning. This means vinegar may support gradual changes when paired with a balanced diet. Digestive Benefits Fermented foods often contain compounds that support digestive health. Incorporating vinegar into meals may improve digestion and reduce bloating, which can make healthy eating more comfortable and sustainable. For many people, digestive comfort is an overlooked aspect of apple cider vinegar weight loss routines. Medical Benefits Beyond Weight Loss Although the phrase apple cider vinegar weight loss focuses on slimming goals, vinegar may offer additional wellness benefits: These advantages suggest that vinegar can be part of a broader metabolic health strategy. How to Use Apple Cider Vinegar Safely Because of its acidity, proper use is essential when exploring apple cider vinegar weight loss. Recommended Amount Most studies use one to two tablespoons diluted in water per day. Starting with a smaller quantity allows the body to adapt while minimizing irritation. Timing and Frequency Some people prefer drinking diluted vinegar before meals, while others use it in cooking. Consistency plays a larger role than timing in most apple cider vinegar weight loss approaches. Dental and Digestive Protection Always dilute vinegar before drinking. Using a straw and rinsing your mouth afterward may help protect tooth enamel. Healthy Recipe Ideas Using Apple Cider Vinegar Adding vinegar to recipes is often more enjoyable and sustainable than drinking it alone. These ideas make apple cider vinegar weight loss strategies feel natural rather than restrictive. Apple Cider Vinegar Detox Drink Ingredients This low-calorie drink can replace sweetened beverages and support hydration. Metabolism-Boosting Salad Dressing Ingredients Using this dressing instead of creamy sauces reduces calories while enhancing flavor, a simple way to support apple cider vinegar weight loss goals. Grilled Vegetable Marinade Combine vinegar with herbs and spices to marinate vegetables before grilling. The acidity enhances texture and taste without heavy fats. ✨ You might also be curious about the Celtic salt trick, a minimalist wellness habit that pairs perfectly with mindful nutrition. Who Might Benefit Most? People seeking gradual improvements may find apple cider vinegar weight loss helpful when combined with: Replacing sugary drinks with diluted vinegar beverages can also reduce overall calorie intake. ✨ For another gentle approach to balanced eating, take a look at our gelatin trick for weight loss — a surprisingly easy addition to your daily routine. Possible Side Effects and Precautions Even natural ingredients require moderation. Excessive use of apple cider vinegar weight loss methods may cause: Individuals with severe acid reflux, kidney disease, or specific medications should consult a healthcare professional before using vinegar regularly. ✨ If you’re exploring natural wellness trends, you may also enjoy discovering this simple baking soda and apple cider vinegar method that many readers find helpful. Common Myths About Apple Cider Vinegar Weight Loss Many online claims exaggerate the effects of vinegar. Myth: Vinegar melts fat instantly.Reality: Research shows gradual, modest changes. Myth: More vinegar means faster results.Reality: Higher doses increase risks without improving outcomes. Myth: Vinegar replaces healthy eating.Reality: Sustainable habits remain essential for real progress. Understanding these facts helps keep expectations realistic when exploring apple cider vinegar weight loss strategies. Practical Tips for Daily Use To integrate vinegar safely: These habits help make apple cider vinegar weight loss part

Apple Cider Vinegar Weight Loss: Medical Facts, Benefits, and Healthy Ways to Use It Read More »

Does Pink Salt Break a Fast

Does Pink Salt Break a Fast? The Complete Guide to Electrolytes, Hydration, and Fasting Science

Intermittent fasting has become one of the most popular wellness habits, and many people experimenting with fasting eventually ask the same question: does pink salt break a fast? With viral trends showing pink salt water drinks and electrolyte mixtures, it can be confusing to know what truly supports fasting and what might interrupt it. Some claim that Himalayan pink salt enhances fat burning, while others worry it could ruin the fasting process. Understanding how fasting works at a metabolic level helps clarify the truth behind these claims. This guide explores the science behind fasting, hydration, and electrolytes to explain clearly whether pink salt fits into a fasting routine. What It Really Means to Break a Fast Before answering does pink salt break a fast, it’s important to define what breaking a fast actually means. Most fasting protocols focus on keeping insulin levels low and avoiding calories that stimulate digestion. Foods containing carbohydrates, proteins, or fats typically end a fast because they provide energy to the body. Salt behaves differently. Unlike food, salt contains minerals rather than calories. Because fasting is mainly about metabolic responses, many experts consider non-caloric ingredients acceptable during fasting windows. When people ask does pink salt break a fast, they are usually wondering whether sodium influences fat burning or autophagy. The answer depends on how pink salt is consumed and whether it is combined with caloric ingredients. Does Pink Salt Break a Fast? The Short Scientific Answer In most cases, does pink salt break a fast can be answered with a simple no. Pink Himalayan salt contains sodium chloride and trace minerals but essentially no calories. Without calories, insulin stimulation is minimal, which means fasting metabolism generally continues unchanged. Many fasting enthusiasts use small amounts of salt in water to help maintain electrolyte balance. The key point is moderation. A tiny pinch of salt dissolved in water is very different from consuming salty foods or drinks containing added sugars. Understanding why does pink salt break a fast is such a common question comes down to the growing popularity of electrolyte drinks. People often confuse hydration strategies with metabolic changes, even though the two are not the same. Why Electrolytes Matter During Fasting When exploring does pink salt break a fast, it’s helpful to understand why electrolytes are discussed so often in fasting communities. During fasting, insulin levels drop, and the body releases more sodium and water through the kidneys. This process can lead to symptoms such as headaches, fatigue, or light-headedness. Electrolytes like sodium support nerve function, muscle contractions, and fluid balance. Some people find that adding a pinch of salt to water reduces discomfort during longer fasting periods. The popularity of pink salt drinks comes from this electrolyte support rather than from any direct fat-burning effect. Asking does pink salt break a fast is really about whether hydration strategies interfere with metabolic goals, and the evidence suggests they usually do not. Pink Salt vs Regular Salt During Fasting Another aspect people consider when asking does pink salt break a fast is whether Himalayan pink salt is healthier than regular table salt. Pink salt contains tiny amounts of minerals such as magnesium or iron, which contribute to its color. However, the nutritional differences between salts are minimal. From a fasting perspective, the most important factor is that salt provides no macronutrients. Whether you choose pink salt, sea salt, or another variety, the metabolic effect remains similar when used in small quantities. So when evaluating does pink salt break a fast, the focus should be on portion size and added ingredients rather than the specific type of salt. The Viral Pink Salt Fasting Trend Social media has played a major role in popularizing the question does pink salt break a fast. Videos often claim that pink salt drinks detoxify the body or accelerate weight loss. While hydration can make fasting feel easier, salt itself does not directly cause fat loss. Fasting works because it reduces calorie intake and shifts energy metabolism, not because of specific minerals. Pink salt water may help people stay hydrated, but it should not be viewed as a miracle solution. Understanding the difference between supportive habits and exaggerated claims helps clarify why does pink salt break a fast continues to trend online. ✨ For another trending approach to mindful weight management, take a look at our gelatin trick for weight loss that many readers are curious about. A Simple Fasting-Friendly Pink Salt Drink For those curious about trying electrolyte drinks while fasting, a minimal recipe keeps things simple. Ingredients Instructions This drink contains no calories and is often used as a gentle hydration aid. When people ask does pink salt break a fast, this type of simple preparation is usually what they mean. If you’re exploring natural wellness habits, you may also enjoy our simple baking soda and apple cider vinegar guide for daily balance. Can Pink Salt Help With Weight Loss? Many people researching does pink salt break a fast hope it will enhance fat burning. However, salt alone does not increase metabolism or directly cause weight reduction. The benefits people experience are often related to improved hydration and reduced fasting discomfort. Weight changes from fasting generally come from lower calorie intake, improved insulin sensitivity, and metabolic flexibility. Pink salt may help some individuals maintain consistency, but it is not a substitute for balanced nutrition or healthy lifestyle habits. Who Should Use Caution With Pink Salt Even though the answer to does pink salt break a fast is usually reassuring, not everyone should increase sodium intake. Individuals with hypertension, kidney disease, or certain cardiovascular conditions should monitor their salt consumption carefully. Pregnant or breastfeeding individuals may also have different nutritional needs. Listening to your body remains essential. If symptoms like dizziness or palpitations occur, adjustments to fasting or hydration strategies may be necessary. ✨ Curious about mineral-based fasting tips? Discover the popular Celtic salt trick and how people are using it in their routines. What Actually Breaks a Fast? Understanding what truly

Does Pink Salt Break a Fast? The Complete Guide to Electrolytes, Hydration, and Fasting Science Read More »

Starbucks medicine ball tea

Starbucks Medicine Ball Tea (Copycat Honey Citrus Mint Tea Recipe)

If you love warm, soothing drinks with a refreshing citrus twist, the Starbucks medicine ball tea is one of the most comforting beverages you can make at home. This popular tea combines mint, peach, honey, and lemonade into a smooth, fragrant drink that feels both cozy and uplifting. Originally known as Honey Citrus Mint Tea, the Starbucks medicine ball tea became a favorite among customers looking for a gentle, warming drink with a balanced flavor. Recreating Starbucks medicine ball tea at home is easier than you might think. With a few simple ingredients and a few minutes of preparation, you can enjoy the same comforting experience whenever you want. This copycat version focuses on the authentic taste while allowing you to control sweetness, strength, and temperature according to your preferences. In this detailed guide, you’ll learn how to prepare Starbucks medicine ball tea step by step, along with tips for customization, flavor variations, and serving ideas that make this drink truly special. What Is Starbucks Medicine Ball Tea? The Starbucks medicine ball tea is a hot beverage made from a combination of mint green tea, peach herbal tea, steamed lemonade, hot water, and honey. The blend creates a delicate balance between citrus brightness and herbal freshness. Many people enjoy Starbucks medicine ball tea during colder seasons because the warm liquid and soothing ingredients feel comforting. Despite its nickname, Starbucks medicine ball tea does not contain any medicinal ingredients. The name became popular because customers often order it when they want something warm and calming. Its gentle sweetness and refreshing aroma make it enjoyable even when you’re simply craving a cozy drink. Why Make Starbucks Medicine Ball Tea at Home? Preparing Starbucks medicine ball tea in your own kitchen offers several advantages. First, it’s much more affordable than buying it at a café. Second, you can customize every detail, from the amount of honey to the strength of the tea. Many people find that homemade Starbucks medicine ball tea tastes fresher because you can use high-quality tea bags and adjust the lemonade ratio to suit your taste. Whether you prefer a stronger mint flavor or a lighter citrus profile, making Starbucks medicine ball tea at home gives you full control. Ingredients You Need One of the reasons Starbucks medicine ball tea is so popular is its simplicity. The ingredient list is short and easy to find. Main Ingredients These ingredients come together to create the classic Starbucks medicine ball tea flavor. The mint tea provides freshness, the peach tea adds subtle sweetness, and the honey smooths everything together. Optional Add-Ons Adding these extras can elevate the aroma and make your Starbucks medicine ball tea feel even more special. How to Make Starbucks Medicine Ball Tea Making Starbucks medicine ball tea at home requires only a few simple steps. The key is to keep the liquid hot enough to release flavor without overheating the tea. Step 1: Heat the Liquid Combine hot water and lemonade in a mug or saucepan. Warm the mixture until steaming. Heating the lemonade helps blend the citrus flavor smoothly into the tea base. Step 2: Steep the Tea Place the mint green tea bag and peach herbal tea bag into the hot liquid. Let them steep for about three minutes. This allows the flavors to infuse without becoming bitter. Step 3: Add Honey Remove the tea bags and stir in honey until dissolved. Honey enhances the smooth texture and balances the tartness of the lemonade. Step 4: Serve Warm Pour the Starbucks medicine ball tea into your favorite mug and enjoy immediately. The aroma of citrus and mint will create a relaxing atmosphere from the first sip. Tips for the Best Flavor Even though Starbucks medicine ball tea is simple, a few techniques can improve the taste: Balancing sweetness and citrus is the secret to making Starbucks medicine ball tea taste just right. Flavor Variations Once you master the basic recipe, you can experiment with creative versions of Starbucks medicine ball tea. Light Citrus Version Use more water and less lemonade for a softer flavor. Strong Mint Version Add fresh mint leaves for a cooling, refreshing twist. Caffeine-Free Option Replace the green tea with herbal mint tea to create a caffeine-free Starbucks medicine ball tea. Iced Version Let the tea cool and pour it over ice for a refreshing summer drink. Looking for a nourishing wellness idea? Don’t miss our bariatric seed trick recipe, designed to be both light and satisfying. Is Starbucks Medicine Ball Tea Healthy? While Starbucks medicine ball tea isn’t a medical remedy, many people enjoy its comforting qualities. Honey adds natural sweetness, while tea contains antioxidants that contribute to overall wellness. Warm drinks can also help you feel hydrated and relaxed. The lemonade provides a bright citrus flavor, but you can reduce the quantity if you prefer a lower-sugar Starbucks medicine ball tea. For another soothing homemade option, try our simple prune juice and butter recipe that many readers enjoy as a cozy classic. Serving Suggestions Starbucks medicine ball tea pairs well with light pastries and simple desserts. Try serving it alongside: The warm citrus notes make Starbucks medicine ball tea suitable for both morning and afternoon enjoyment. If you enjoy comforting wellness drinks, you may also love our refreshing cortisol cocktail recipe for a gentle daily boost. Common Questions Does Starbucks medicine ball tea contain caffeine? Yes, the mint green tea contains a small amount of caffeine, though less than coffee. Can I make Starbucks medicine ball tea without honey? You can substitute maple syrup or another natural sweetener, but honey provides the most authentic flavor. How strong should the tea be? Steep for two to four minutes depending on your preference. What is in the Medicine Ball tea at Starbucks? The Medicine Ball tea at Starbucks is made with mint green tea, peach herbal tea, hot lemonade, hot water, and honey. This blend creates a warm citrus-mint flavor that is both soothing and refreshing. How do you order the Medicine

Starbucks Medicine Ball Tea (Copycat Honey Citrus Mint Tea Recipe) Read More »

Low carb wraps

Low Carb Wraps: A Complete Guide to Healthy, Flexible Homemade Alternatives

Low carb wraps are an essential staple for anyone looking to reduce carbohydrates without giving up the convenience and enjoyment of wraps, tortillas, and flatbreads. Whether your goal is weight management, blood sugar control, or following a ketogenic lifestyle, low carb wraps make it easy to enjoy satisfying meals while staying within your nutritional goals. From breakfast to dinner, they fit seamlessly into everyday cooking. This guide explores everything you need to know about low carb wraps, including what they are, why homemade versions are ideal, how to prepare them successfully, and the many ways they can be used in daily meals. What Are Low Carb Wraps? Low carb wraps are alternatives to traditional wheat-based tortillas that significantly reduce carbohydrate content while preserving softness, flexibility, and structure. Standard flour tortillas often contain between 20 and 30 grams of carbohydrates per serving. In comparison, well-prepared low carb wraps typically contain fewer than 5 grams of net carbs. These wraps are usually made with ingredients such as coconut flour, almond flour, egg whites, eggs, or fiber-rich binders. The goal is to replace refined grains with low-glycemic ingredients that still allow the wrap to bend, roll, and hold fillings without breaking. Because of their composition, low carb wraps are suitable for ketogenic, gluten-free, diabetic-friendly, and low-glycemic diets. Why Homemade Low Carb Wraps Are the Best Choice Although packaged versions exist, homemade low carb wraps offer clear advantages. Ingredient Transparency Preparing low carb wraps at home ensures complete control over ingredients. There are no hidden starches, added sugars, or preservatives. This is especially important for those following strict dietary protocols. Superior Texture Freshly cooked low carb wraps are generally softer and more flexible than store-bought alternatives. Homemade versions are less likely to crack or dry out when folded or rolled. Cost Efficiency Making low carb wraps at home is often more economical than purchasing specialty products, particularly when cooking in batches. Customization Homemade wraps can be tailored for neutral, savory, or lightly seasoned flavors depending on how they will be used. Key Ingredients Used in Low Carb Wraps Most low carb wraps rely on a small group of essential ingredients, each serving a specific purpose. Coconut flour is particularly popular because of its ability to absorb liquid and create soft yet sturdy wraps when combined with eggs. Basic Homemade Low Carb Wrap Recipe This simple recipe yields soft, flexible low carb wraps suitable for wraps, burritos, or tacos. Ingredients (8–12 wraps) Instructions Stack the finished low carb wraps between sheets of parchment paper to keep them soft. Common Mistakes and How to Avoid Them Many first-time cooks encounter issues when making low carb wraps. These problems are easy to fix. Cooking slowly and keeping the batter thin but fluid produces the best results. For a creamy, protein-rich pairing, try our cottage cheese spinach and artichoke dip, perfect for light and satisfying meals. Variations of Low Carb Wraps There are many creative ways to prepare low carb wraps using different ingredient combinations. Egg-Based Wraps Made with eggs or egg whites only, these wraps are thin, high in protein, and ideal for breakfast or light meals. Vegetable-Enhanced Wraps Zucchini, spinach, or cauliflower can be added for extra nutrients without increasing carbohydrates significantly. Lettuce Wraps While not traditional wraps, lettuce leaves serve as a fresh, carb-free alternative for quick meals. Each variation maintains the core principle of low carb wraps: minimal carbohydrates with maximum usability. If you enjoy simple homemade staples, you may also love our strawberry jam made without pectin, naturally sweet and beautifully balanced. How to Use Low Carb Wraps in Daily Meals Low carb wraps can replace bread and tortillas in countless dishes. Breakfast Fill with eggs, cheese, and vegetables for a filling start to the day. Lunch Use low carb wraps for chicken, turkey, or tuna wraps paired with fresh greens. Dinner They work well for tacos, fajitas, quesadillas, or wrap-style sandwiches. Snacks Bake cut wraps into crisp pieces or roll and slice them into pinwheels. Because they reheat well, low carb wraps are excellent for meal preparation. For a comforting, nourishing option, our classic chicken consommé is a timeless recipe worth exploring. Storage and Meal Prep Tips To maintain freshness and flexibility: Avoid overheating, which can cause the wraps to become brittle. Health Benefits of Low Carb Wraps Replacing traditional tortillas with low carb wraps may help support stable blood sugar levels and improved satiety. Lower carbohydrate intake can reduce post-meal energy crashes and support weight management goals. These wraps are often higher in protein and fiber, helping you feel fuller for longer while maintaining steady energy levels. Homemade vs Store-Bought Low Carb Wraps Store-bought options are convenient, but homemade low carb wraps generally provide better ingredient quality and texture. Preparing them at home allows full control over thickness, flavor, and freshness. For many people, learning to make loww carb wraps becomes a valuable kitchen skill that supports long-term healthy eating. Frequently Asked Questions Which wraps are lowest in carbs?The lowest-carb wraps are usually made from egg whites, coconut flour, or fiber-rich ingredients like psyllium husk. Lettuce wraps are the lowest overall since they contain almost no carbohydrates. Can I eat wraps on a low carb diet?Yes. Wraps can fit into a low carb diet as long as they are made without wheat flour or refined grains. Low carb wraps are specifically designed to reduce carbohydrates while remaining flexible and filling. Do 0 carb tortillas exist?True zero-carb tortillas do not naturally exist. Some products are labeled “zero carb” due to high fiber content, but they still contain minimal total carbohydrates. Lettuce or vegetable leaves are the closest natural alternative. Which bread is lowest in carbs?Breads made with almond flour, coconut flour, or high fiber blends are typically the lowest in carbs. Compared to traditional bread, these options significantly reduce carbohydrate intake. Final Thoughts Loww carb wraps offer a practical, satisfying alternative to traditional tortillas without compromising flexibility or taste. With simple ingredients and careful cooking, they can be used for breakfast,

Low Carb Wraps: A Complete Guide to Healthy, Flexible Homemade Alternatives Read More »

baking soda and apple cider vinegar

Baking Soda and Apple Cider Vinegar: A Recipe-Focused Guide with Practical Health Context

The combination of baking soda and apple cider vinegar has long been used in cooking, baking, and traditional home practices. These two simple ingredients are found in most kitchens and are valued for their versatility, affordability, and unique chemical interaction. While some people associate baking soda and apple cider vinegar with health trends, their most reliable and well-established uses remain culinary. This article explores how baking soda and apple cider vinegar work together in recipes, explains the science behind their reaction, and provides a cautious overview of their occasional use in beverages. The focus is on safe, informed use rather than exaggerated claims, making this guide suitable for food blogs, lifestyle websites, and educational platforms. Understanding the Two Ingredients To use baking soda and apple cider vinegar properly, it is important to understand the role of each ingredient. Baking Soda Baking soda, or sodium bicarbonate, is an alkaline compound commonly used as a leavening agent. When combined with an acid, it produces carbon dioxide gas, which helps doughs and batters rise. Baking soda is powerful, meaning only small amounts are needed in recipes. Because baking soda contains sodium and influences acid–base balance, it should always be used with precision, especially outside of baking. Apple Cider Vinegar Apple cider vinegar is made by fermenting apples into alcohol and then into acetic acid. It has a sharp, tangy flavor and is widely used in dressings, marinades, sauces, and pickling. In recipes, apple cider vinegar adds brightness and depth without overpowering other ingredients. Nutritionally, apple cider vinegar is often discussed in relation to digestion and blood sugar response, though these effects are generally modest. The Science Behind Baking Soda and Apple Cider Vinegar When baking soda and apple cider vinegar are mixed, a chemical reaction occurs immediately. The acidic vinegar reacts with the alkaline baking soda, releasing carbon dioxide gas. This reaction causes fizzing and bubbling. In cooking, this reaction is useful because it: Once the reaction is complete, the mixture becomes closer to neutral in taste and acidity. Culinary Uses of Baking Soda and Apple Cider Vinegar Baking Applications The most common and reliable use of baking soda and apple cider vinegar is in baking. This combination is especially popular in: Apple cider vinegar activates the baking soda without leaving a noticeable vinegar flavor when measured correctly. Savory Cooking Apple cider vinegar is often used to enhance savory dishes, adding balance and brightness. Baking soda may occasionally be used in very small amounts to soften legumes or reduce bitterness in vegetables, though excessive use should be avoided to preserve nutrients. Food Preparation and Kitchen Use Outside of cooking, baking soda and apple cider vinegar are commonly used separately in food preparation to clean produce, neutralize odors, and maintain kitchen surfaces. These uses are non-culinary but highlight the versatility of both ingredients. Baking Soda and Apple Cider Vinegar Drink Recipe ⚠️ This recipe is for informational purposes only and should not be consumed regularly. Ingredients Instructions This simple drink demonstrates the reaction between baking soda and apple cider vinegar and results in a milder flavor than vinegar alone. Taste and Texture The drink made with baking soda and apple cider vinegar has a lightly tangy taste with reduced sharpness. Some people find it smoother than diluted vinegar on its own. Optional additions like a small amount of honey or cinnamon may improve palatability. Health Context: A Cautious Overview Digestive Sensation Apple cider vinegar may stimulate digestive secretions in some individuals. Baking soda temporarily neutralizes acidity. When combined, baking soda and apple cider vinegar may feel gentler on the stomach for certain people, though experiences vary. Blood Sugar Considerations Some studies associate apple cider vinegar with a reduced blood sugar response after meals. Baking soda does not contribute to this effect and should not be used for metabolic purposes. Clarifying Common Misconceptions A frequent claim is that baking soda and apple cider vinegar “alkalize the body.” In reality, the human body regulates blood pH very tightly. Diet does not override this system. Safety and Responsible Use Using baking soda and apple cider vinegar incorrectly can cause side effects. People with kidney disease, heart conditions, digestive disorders, or those who are pregnant should avoid consuming baking soda unless advised by a professional. Those exploring gentle, food-inspired alternatives may also enjoy discovering our natural Zepbound-style recipe. Frequency of Use For baking and cooking, baking soda and apple cider vinegar are safe when used according to recipes. For beverages, use should be occasional rather than routine. This mixture is not intended for daily or long-term consumption. If you’re curious about other mineral-based wellness methods, our Celtic salt trick offers an interesting complementary perspective. Alternatives Without Baking Soda If the goal is flavor or gentle digestive comfort, alternatives include: These options avoid the risks associated with baking soda ingestion. For a deeper look at how this approach is applied in practice, you may find our baking soda trick for men particularly insightful. Frequently Asked Questions Do baking soda and apple cider vinegar cancel each other out? No. Their reaction is what makes them useful, especially in baking. Are baking soda and apple cider vinegar effective for weight loss? There is no strong scientific evidence supporting this claim. Is long-term use safe? Long-term consumption of baking soda is not recommended. What is the baking soda and apple cider vinegar trick? The baking soda and apple cider vinegar trick refers to mixing a small amount of baking soda with diluted apple cider vinegar to create a fizzing reaction. This reaction neutralizes acidity and is commonly used in baking, while some people also try it occasionally as a homemade drink. It should be used cautiously and not as a daily habit. What is the difference between bicarbonate of soda and baking soda? There is no difference between bicarbonate of soda and baking soda. They are two names for the same compound, sodium bicarbonate. The term “bicarbonate of soda” is more common in British and European English, while “baking soda” is

Baking Soda and Apple Cider Vinegar: A Recipe-Focused Guide with Practical Health Context Read More »

Prune Juice and Butter Recipe

Prune Juice and Butter Recipe: Natural Digestive Relief That Works Fast

The prune juice and butter recipe has become increasingly popular as a natural, home-based solution for occasional digestive discomfort. Many people are searching for gentle alternatives to commercial laxatives, and this simple combination has drawn attention because it uses familiar ingredients that are easy to prepare and widely available. Although it may sound unusual at first, the idea behind this drink is rooted in the known digestive properties of prune juice combined with a small amount of dietary fat. This article explores the prune juice and butter recipe in detail, including how it works, how to prepare it correctly, when to use it, and important considerations for safe use. The goal is to provide a clear, balanced, and informative guide suitable for a high-quality recipe or wellness blog. What Is the Prune Juice and Butter Recipe? The prune juice and butter recipe is a warm beverage made by gently heating prune juice and stirring in a small amount of unsalted butter until fully melted. It is typically consumed on an empty stomach, most often in the morning or in the evening before bed. This recipe is not a traditional culinary dish but rather a functional drink used for digestive support. Its popularity comes largely from personal experiences shared online and from the long-standing reputation of prune juice as a natural aid for bowel regularity. Why Prune Juice Plays a Central Role Prune juice is produced from dried plums that are rehydrated and pressed into liquid form. It has been used for decades to support digestion, making it the key ingredient in the prune juice and butter recipe. Sorbitol and Water Retention Prune juice naturally contains sorbitol, a type of sugar alcohol that attracts water into the intestines. This process helps soften stool and encourages smoother bowel movements. This mechanism is one of the primary reasons prune juice is effective for digestive support. Natural Fiber Content While prune juice contains less fiber than whole prunes, it still contributes soluble fiber, which helps regulate stool consistency and movement. When combined with adequate hydration, this fiber supports overall gut function. Micronutrients and Hydration Prune juice provides potassium and antioxidants that support muscle activity and fluid balance in the digestive system. Hydration plays a crucial role in maintaining regular digestion, and prune juice contributes to daily fluid intake. The Purpose of Butter in the Recipe The inclusion of butter in the prune juice and butter recipe is intentional and functional rather than purely for taste. Dietary Fat and Digestive Response Dietary fats stimulate bile release, which plays a role in digestion and intestinal movement. A small amount of butter may help activate digestive processes and complement the effects of prune juice. Texture and Palatability Butter gives the drink a smoother texture and slightly mellows the intense sweetness of prune juice. When consumed warm, this combination can feel soothing to the digestive system. Choosing the Right Butter Unsalted butter is recommended to avoid excess sodium. Using only a small quantity ensures the drink remains gentle and easy to digest. Ingredients You Will Need To prepare the classic prune juice and butter recipe, you only need: Optional ingredients for flavor: These additions are optional and do not significantly affect the digestive function of the recipe. How to Make the Prune Juice and Butter Recipe Step 1: Heat the Prune Juice Warm the prune juice gently in a saucepan or microwave. It should be warm but not boiling. Step 2: Add the Butter Add one teaspoon of unsalted butter to the warm juice and stir until fully melted. Step 3: Mix Thoroughly Ensure the butter is evenly incorporated for a smooth texture. Step 4: Drink Slowly Sip the drink slowly while it is warm, preferably on an empty stomach. Preparing the prune juice and butter recipe takes less than five minutes and requires no special equipment. When Is the Best Time to Use It? Most people use the prune juice and butter recipe either in the morning or in the evening. The timing depends on personal preference and digestive response. For a soothing and visually stunning drink, be sure to explore our Butterfly Pea Flower Tea recipe, loved for both its color and calming properties How Often Should It Be Used? This recipe is intended for occasional use, not daily consumption. Using the prune juice and butter recipe responsibly helps avoid dependency. If you enjoy warm, aromatic beverages, our Clove Tea recipe is a wonderful option to complement your daily wellness routine. Potential Benefits The prune juice and butter recipe may offer several benefits when used occasionally: These benefits make it appealing for people seeking a natural digestive aid. Those looking for a simple, functional blend may also appreciate our Bariatric Seed Trick recipe, thoughtfully created for mindful eating habits Possible Side Effects and Precautions While generally safe for most adults, some precautions should be considered: Listening to your body is essential when using any digestive remedy. Variations of the Recipe Dairy-Free Option Replace butter with coconut oil or olive oil. Lighter Version Use half a teaspoon of butter instead of a full teaspoon. Flavor Variation Add cinnamon or vanilla for taste without affecting digestion. These variations allow flexibility while maintaining the core concept of the prune juice and butter recipe. Supporting Digestive Health Naturally While the prune juice and butter recipe can help occasionally, long-term digestive health depends on daily habits: These factors reduce the need for remedies over time. Frequently Asked Questions Is the prune juice and butter recipe safe for regular use?It is best used occasionally rather than daily. Can it replace medical treatment?No. Persistent digestive issues should always be evaluated by a healthcare professional. Why do people put butter in prune juice?Butter adds a small amount of fat that may help stimulate digestion and support bowel movement, while also softening the strong taste of prune juice. How quickly do prune juice and butter work?Results vary, but many people notice an effect within a few hours to the next day, depending on individual

Prune Juice and Butter Recipe: Natural Digestive Relief That Works Fast Read More »