Lemon Cream Sauce Recipe: 4 Amazing Tips for a Smooth, Rich, and Flavorful Sauce
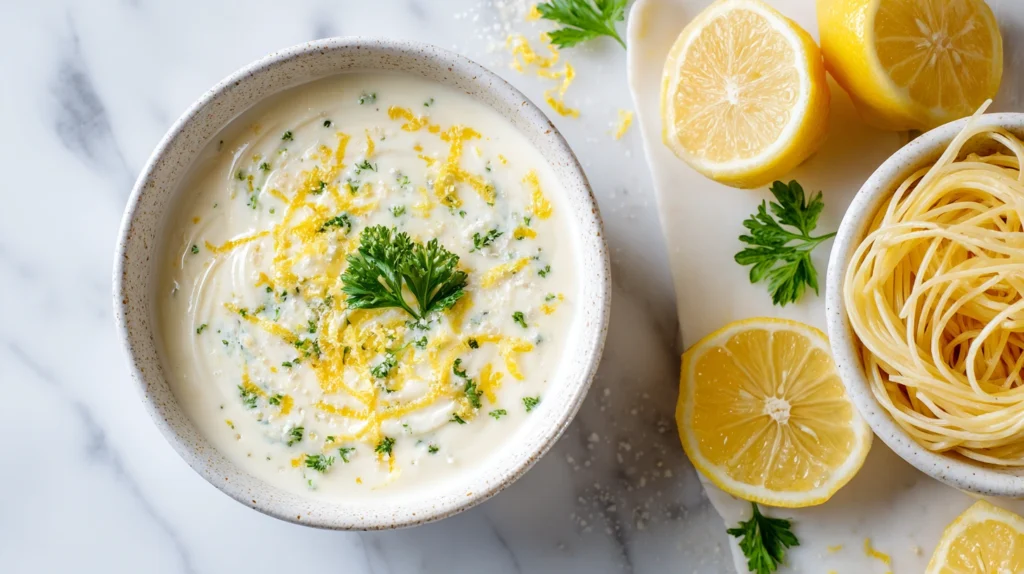
Lemon Cream Sauce is one of those versatile recipes every home cook should keep in their collection. Rich, silky, and bursting with fresh citrus flavor, this sauce transforms simple ingredients into a restaurant-quality meal. Whether you’re serving it over pasta, drizzling it onto grilled chicken, spooning it over salmon, or pairing it with roasted vegetables, this creamy lemon sauce delivers the perfect balance of richness and brightness. The beauty of a homemade Lemon Cream Sauce Recipe lies in its simplicity. With just a handful of ingredients, you can create a luxurious sauce in less than 20 minutes. The combination of heavy cream, fresh lemon juice, garlic, butter, and Parmesan cheese creates a smooth texture and a vibrant flavor profile that complements countless dishes. In this guide, you’ll learn everything you need to know about making the perfect lemon cream sauce, including ingredient tips, step-by-step instructions, storage advice, variations, and serving suggestions. Why You’ll Love This Lemon Cream Sauce Recipe There are many reasons why this Lemon Cream Sauce Recipe has become a favorite among home cooks: The fresh lemon helps cut through the richness of the cream, creating a balanced sauce that feels indulgent yet refreshing. What Is Lemon Cream Sauce? Lemon Cream Sauce is a smooth, creamy sauce made from heavy cream, butter, garlic, fresh lemon juice, and often Parmesan cheese. The sauce combines the richness of dairy with the acidity of lemon, creating a flavor that is both comforting and vibrant. This sauce is commonly served with: Its versatility makes it one of the most useful sauces in home cooking. Ingredients To Make Lemon Cream Sauce Recipe For the Lemon Cream Sauce Optional Additions Ingredient Notes Heavy Cream Heavy cream is the foundation of the sauce. Its high fat content creates a silky texture and helps prevent curdling when lemon juice is added. Fresh Lemon Juice Always use freshly squeezed lemon juice. Fresh lemons provide a brighter flavor than bottled juice and make a noticeable difference in the finished sauce. Lemon Zest Lemon zest adds concentrated citrus aroma without additional acidity. It enhances the overall lemon flavor and gives the sauce a more vibrant taste. Garlic Fresh garlic provides savory depth that balances the richness of the cream and butter. Parmesan Cheese Parmesan contributes a nutty, slightly salty flavor while helping the sauce become thicker and creamier. How to Make Lemon Cream Sauce Recipe Step 1: Melt the Butter Place a medium saucepan over medium heat. Add the butter and allow it to melt completely. Step 2: Cook the Garlic Add the minced garlic and sauté for about 30–60 seconds until fragrant. Avoid browning the garlic, as it can become bitter. Step 3: Add the Cream Slowly pour in the heavy cream while whisking. Bring the mixture to a gentle simmer. Allow the cream to cook for 3–4 minutes, stirring occasionally. Step 4: Add Lemon and Cheese Whisk in: Continue cooking for another 2–3 minutes until the sauce thickens slightly. Step 5: Finish the Sauce Remove from heat and stir in fresh parsley. Taste and adjust seasoning if needed. Serve immediately while warm and creamy. Tips for the Best Lemon Cream Sauce Recipe Use Fresh Ingredients Fresh lemon juice, fresh garlic, and freshly grated Parmesan provide the best flavor. Add Lemon Juice Gradually Adding lemon juice slowly helps maintain a smooth texture and allows you to adjust the tartness. Avoid High Heat Boiling the sauce aggressively can cause the cream to separate. Keep the heat moderate and maintain a gentle simmer. Stir Frequently Regular stirring prevents sticking and helps create a smooth consistency. Serve Immediately Cream sauces are always best served fresh. Delicious Ways to Use Lemon Cream Sauce Recipe With Pasta One of the most popular uses for Lemon Cream Sauce Recipe is pasta. Try it with: Toss the hot pasta directly into the sauce for maximum flavor. With Chicken This sauce pairs beautifully with: The citrus flavor brightens the savory chicken perfectly. With Seafood Lemon and seafood are a classic combination. Serve the sauce over: With Vegetables Drizzle the sauce over: With Rice A spoonful of lemon cream sauce can transform plain rice into a rich and flavorful side dish. Easy Variations Garlic Lemon Cream Sauce Double the garlic for a bolder flavor. Parmesan Lemon Cream Sauce Add an extra ¼ cup Parmesan cheese for a richer texture. Spicy Lemon Cream Sauce Mix in a pinch of red pepper flakes for gentle heat. Herb Lemon Cream Sauce Add fresh herbs such as: Lemon Cream Sauce for Salmon Add fresh dill and extra lemon zest to create a sauce that complements salmon perfectly. If you enjoy bold flavors with a spicy kick, our Volcano Sauce is a delicious way to elevate sandwiches, burgers, and snacks. Common Mistakes to Avoid Using Low-Fat Dairy Milk and low-fat cream can separate more easily and produce a thinner sauce. Overheating High temperatures may cause the cream to break or become grainy. Adding Too Much Lemon Too much lemon juice can overpower the sauce. Start with a small amount and adjust gradually. Using Pre-Grated Cheese Freshly grated Parmesan melts more smoothly and creates a better texture. Looking for another versatile sauce? Our Easy Thai Peanut Sauce delivers the perfect balance of creamy, savory, and nutty flavors. How to Thicken Lemon Cream Sauce If your sauce seems too thin, try these methods: Simmer Longer Allow the sauce to reduce naturally for a few more minutes. Add Parmesan Extra Parmesan cheese can help thicken the sauce while adding flavor. Use a Small Amount of Cornstarch Slurry Mix 1 teaspoon cornstarch with 1 tablespoon cold water and whisk into the simmering sauce. For a creamy and protein-packed appetizer, try our Cottage Cheese Queso Dip, a lighter twist on a classic favorite. How to Prevent Curdling The combination of cream and lemon can sometimes cause concern, but curdling is easy to avoid. Follow these tips: These simple steps help maintain a smooth and creamy consistency. Storage Instructions Refrigeration Store leftover sauce in an airtight container
Lemon Cream Sauce Recipe: 4 Amazing Tips for a Smooth, Rich, and Flavorful Sauce Read More »