diamondmeals.com

Appetizers

Homemade Perfectly Seasoned Collard Greens

Homemade Perfectly Seasoned Collard Greens: A Rich and Flavorful Southern Classic

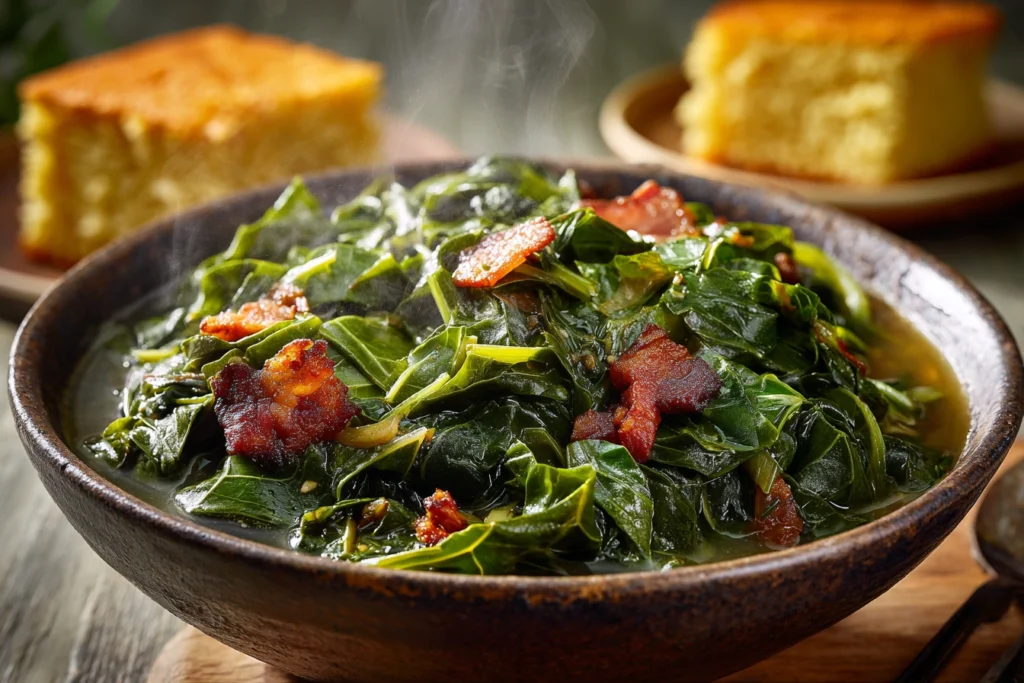
Few dishes carry as much comfort and tradition as Homemade Perfectly Seasoned Collard Greens. This deeply rooted Southern staple transforms simple leafy greens into a tender, savory, and satisfying side dish that pairs beautifully with countless meals. When prepared correctly, collards lose their bitterness and become silky, flavorful, and rich with layers of seasoning. If you want a method that guarantees balanced flavor, tender texture, and authentic depth, this guide will walk you step by step through making Homemade Perfectly Seasoned Collard Greens the right way. Why Collard Greens Are So Special Collard greens are sturdy, dark leafy vegetables known for their slightly earthy and mildly bitter flavor. Unlike delicate greens, they require slow cooking to unlock their best texture and taste. That slow simmering process is what makes Homemade Perfectly Seasoned Collard Greens so irresistible. Beyond flavor, collard greens are extremely nutritious. They are rich in fiber, vitamin K, vitamin A, vitamin C, calcium, and antioxidants. When simmered gently, they retain much of their nutritional value while absorbing seasoning beautifully. The Key to Flavorful Collard Greens The difference between bland greens and Homemade Perfectly Seasoned Collard Greens lies in three elements: Collard greens need time to soften and absorb flavor. Rushing the cooking process can leave them tough or bitter. Patience is essential. Ingredients You’ll Need To prepare authentic Homemade Perfectly Seasoned Collard Greens, gather the following: These ingredients create the deep, savory foundation necessary for truly Homemade Perfectly Seasoned Collard Greens. Step 1: Clean and Prepare the Greens Proper preparation ensures your Homemade Perfectly Seasoned Collard Greens are smooth and grit-free. Start by removing the thick stems from each leaf. Fold the leaf in half and slice along the stem to separate it. Stack the leaves, roll them tightly, and slice into one-inch ribbons. Place the chopped greens in a large bowl of cold water and swish them around thoroughly. Dirt often hides in the folds. Lift the greens out of the water rather than pouring them out, leaving any grit behind. Clean greens are the foundation of excellent Homemade Perfectly Seasoned Collard Greens. Step 2: Build the Flavor Base In a large Dutch oven over medium heat, cook the chopped bacon until crispy and the fat has rendered. This smoky fat becomes the backbone of your seasoning. Remove excess grease if needed, leaving about two tablespoons. Add the chopped onion and sauté until soft and translucent. Stir in the garlic and cook briefly until fragrant. This aromatic mixture is what gives Homemade Perfectly Seasoned Collard Greens their rich, savory depth. Step 3: Add the Greens and Liquid Add the sliced greens to the pot in batches. They may look like a large volume at first, but they will quickly wilt. Pour in the broth and stir to combine. Season with salt, pepper, and optional red pepper flakes. Bring everything to a gentle simmer. Once bubbling lightly, reduce heat to low and cover. This is when Homemade Perfectly Seasoned Collard Greens begin their transformation. Step 4: Simmer Low and Slow Allow the greens to simmer gently for 45 minutes to 1 hour. During this time: Stir occasionally to ensure even cooking. Low heat ensures the greens cook evenly without becoming mushy. Slow cooking is the defining characteristic of Homemade Perfectly Seasoned Collard Greens. Step 5: Finish with Brightness After the greens are fully tender, stir in the apple cider vinegar. This small addition brightens the dish, balances the smokiness, and enhances the overall flavor profile. Taste and adjust seasoning if necessary. At this stage, your Homemade Perfectly Seasoned Collard Greens are ready to serve. For a bold and tangy side that pairs beautifully with these greens, try our horseradish pickles for an extra layer of vibrant flavor. What Is Pot Liquor? As the greens cook, they release flavorful liquid known as pot liquor. This nutrient-rich broth contains minerals and flavor extracted from the greens and seasoning. Many people consider pot liquor an essential part of Homemade Perfectly Seasoned Collard Greens. It can be spooned over rice, soaked up with cornbread, or enjoyed on its own. Never discard it — it holds incredible flavor. If you enjoy herb-forward seasonings, our homemade chimichurri seasoning adds a fresh and aromatic twist to any savory dish. How to Reduce Bitterness If you find collard greens slightly bitter, here are helpful adjustments when preparing Homemade Perfectly Seasoned Collard Greens: Proper seasoning and cooking time eliminate harsh flavors while preserving depth. To complement the smoky depth of this recipe, consider serving it alongside our pickled garlic for a deliciously sharp contrast. Serving Suggestions Homemade Perfectly Seasoned Collard Greens pair well with: They are especially popular during holidays and Sunday dinners, but they are equally delicious as an everyday side dish. Storage and Reheating One of the best features of Homemade Perfectly Seasoned Collard Greens is how well they store. Refrigerate in an airtight container for up to 4 days. To freeze, cool completely and store in freezer-safe containers for up to 3 months. Reheat gently on the stovetop with a splash of broth to restore moisture. In fact, Homemade Perfectly Seasoned Collard Greens often taste even better the next day as the flavors deepen. Nutritional Benefits Collard greens are nutrient-dense and support overall health. Homemade Perfectly Seasoned Collard Greens provide: This dish offers comfort while still being wholesome and nourishing. Variations to Try You can personalize Homemade Perfectly Seasoned Collard Greens in several ways: Each variation keeps the spirit of Homemade Perfectly Seasoned Collard Greens intact while adapting to different tastes. Final Thoughts Mastering Homemade Perfectly Seasoned Collard Greens is about patience, balance, and proper seasoning. With simple ingredients and slow cooking, collard greens transform into a dish rich in history and flavor. The combination of smokiness, gentle acidity, and tender greens creates a deeply satisfying experience. Whether served at a family gathering or prepared for a quiet dinner at home, Homemade Perfectly Seasoned Collard Greens remain a timeless classic. Once you try this method, you’ll understand why Homemade Perfectly Seasoned Collard Greens

Homemade Perfectly Seasoned Collard Greens: A Rich and Flavorful Southern Classic Read More »

Horseradish Pickles

Horseradish Pickles: A Bold and Flavorful Homemade Classic

If you enjoy vibrant flavors with a little heat, horseradish pickles are the perfect addition to your kitchen repertoire. Crisp cucumbers infused with sharp horseradish create a bold twist on traditional pickles. The balance of tangy vinegar, aromatic spices, and that unmistakable sinus-clearing kick makes them unforgettable. Homemade horseradish pickles are surprisingly easy to prepare. With a simple brine and fresh ingredients, you can create jars of crunchy, spicy goodness that elevate sandwiches, burgers, salads, and charcuterie boards. What Are Horseradish Pickles? At their core, horseradish pickles are cucumbers preserved in a vinegar-based brine enhanced with freshly grated or prepared horseradish root. While classic dill pickles rely mainly on garlic and herbs, this variation introduces a peppery intensity that deepens the flavor profile. Horseradish belongs to the mustard family and releases natural compounds when grated. These compounds are responsible for its distinctive heat. When combined with vinegar, salt, and spices, the root transforms ordinary cucumbers into something complex and bold. The result is a pickle that delivers: Why Make Them at Home? Store-bought options rarely capture the brightness of freshly made horseradish pickles. When you prepare them yourself, you control: Homemade batches also allow you to experiment with variations while preserving the satisfying crunch that makes good pickles irresistible. Choosing the Right Cucumbers The foundation of excellent horseradish pickles begins with selecting the best cucumbers. Look for small pickling varieties that are: Fresh cucumbers produce crisp results. For optimal texture, pickle them within 24 hours of purchasing or harvesting. Before brining, rinse thoroughly and trim a thin slice from the blossom end. This small step helps maintain firmness during storage. The Essential Ingredients Here is a balanced refrigerator-style recipe for horseradish pickles. For the Pickles: For the Brine: This combination allows the flavor of horseradish to shine without overwhelming the natural freshness of the cucumbers. Step-by-Step Preparation 1. Prepare the Cucumbers Wash and dry them carefully. Leave whole, slice into spears, or cut into coins depending on preference. 2. Make the Brine Combine water, vinegar, salt, sugar, and spices in a saucepan. Bring to a gentle boil, stirring until dissolved. Remove from heat and allow to cool slightly. 3. Layer the Jars Place dill, garlic, and half of the grated horseradish at the bottom of sterilized jars. 4. Pack Tightly Arrange cucumbers tightly inside the jars. Add the remaining horseradish over the top. 5. Pour the Brine Cover the cucumbers completely with brine. Ensure no air pockets remain. 6. Refrigerate Seal jars and refrigerate for at least 48 hours. For best flavor, wait 4–5 days before enjoying. These refrigerator horseradish pickles develop stronger character over time. Flavor Development During the first two days, vinegar provides dominant tanginess. As the days pass, the horseradish integrates fully into the brine. After several days, the flavor becomes rounder and more balanced. The spice level depends on the freshness and quantity of horseradish used. You can easily adjust it to suit your tolerance. Variations to Try One of the pleasures of making horseradish pickles is customizing the flavor. Extra-Spicy Version Increase the grated horseradish and add additional red pepper flakes. Sweet and Spicy Add slightly more sugar for contrast between heat and sweetness. Garlic-Forward Double the garlic for deeper savory notes. Fermented Method Use a saltwater brine instead of vinegar and allow natural fermentation at room temperature for several days before refrigerating. Each variation maintains the signature character while introducing subtle differences. Serving Ideas Horseradish pickles pair beautifully with rich foods. Their acidity cuts through fat and enhances savory dishes. Try serving them: Their crisp texture and bold flavor make them a standout condiment. For a creamy and refreshing pairing, try our cilantro lime crema — it adds the perfect smooth contrast to bold, spicy flavors. Storage and Safety Because these are refrigerator-style horseradish pickles, they are not shelf-stable. Always store them in the refrigerator. For best quality, consume within 3–4 weeks. Discard if you notice: Proper hygiene and clean jars ensure safe preparation. To deepen the herbal notes and bring vibrant seasoning to your table, explore our homemade chimichurri seasoning for an irresistible flavor boost. Nutritional Overview Horseradish pickles are low in calories and fat-free. They contain small amounts of vitamin C and antioxidants from both cucumbers and horseradish. Horseradish itself contains natural plant compounds associated with antimicrobial and digestive-support properties. However, like all pickled foods, they contain sodium, so moderation is recommended. If you enjoy tangy, punchy condiments, don’t miss our pickled garlic recipe — a deliciously sharp addition to any savory spread. Final Thoughts Homemade horseradish pickles offer an exciting upgrade to traditional pickles. They deliver crisp texture, vibrant acidity, and a distinctive spicy finish that transforms simple meals into memorable ones. With fresh cucumbers, quality horseradish, and a well-balanced brine, you can create jars of horseradish pickles that are flavorful, customizable, and deeply satisfying. Once you experience their bold character, they may become a permanent favorite in your kitchen. This recipe has been thoughtfully inspired by insights from https://emilykylenutrition.com/horseradish-pickles/, whose approach to flavor balance and technique helped shape this version.

Horseradish Pickles: A Bold and Flavorful Homemade Classic Read More »

pickled garlic

Pickled Garlic Recipe – Easy Homemade Tangy Garlic Cloves

If you enjoy bold, vibrant flavors in your cooking, pickled garlic is a must-have ingredient in your kitchen. This simple preparation transforms sharp raw garlic cloves into mellow, tangy, and slightly sweet bites that enhance everything from salads to charcuterie boards. Easy to prepare and surprisingly versatile, pickled garlic is one of those homemade staples that feels gourmet yet requires minimal effort. In this complete guide, you’ll learn exactly how to make it, how it changes in flavor over time, storage tips, and the best ways to use it in everyday meals. What Is Pickled Garlic? Pickled garlic is fresh garlic that has been preserved in a vinegar-based brine. The acidity softens the harsh bite of raw garlic while maintaining its aromatic depth. Instead of the intense spiciness that raw cloves can bring, the pickling process creates a smoother, tangier flavor that is easier to enjoy on its own. During the pickling process, garlic absorbs the vinegar mixture and gradually becomes tender. After a few weeks, the cloves develop a balanced taste — still garlicky, but rounded and pleasantly sharp rather than overpowering. Unlike fermented garlic, which depends on beneficial bacteria to develop over time, this method uses vinegar to safely preserve the cloves in the refrigerator. Why You Should Make It at Home Making pickled garlic yourself offers several advantages: Longer Shelf Life Fresh peeled garlic lasts only a short time before drying out or sprouting. Once preserved in vinegar, it can stay fresh for months when refrigerated properly. Milder Flavor Profile Many people find raw garlic too aggressive. Pickling reduces that intensity while keeping its signature aroma intact. Versatility in Cooking From appetizers to main dishes, this preserved ingredient adds brightness and depth without overwhelming a recipe. Customizable Taste You can easily adjust sweetness, acidity, and spice levels depending on your preference. Classic Pickled Garlic Recipe This traditional method is simple, reliable, and beginner-friendly. Ingredients Step-by-Step Instructions 1. Prepare the Garlic Peel the cloves carefully and remove any bruised pieces. Rinse lightly and dry thoroughly. 2. Heat the Brine In a saucepan, combine vinegar, salt, and sugar. Bring to a gentle boil and stir until dissolved. 3. Fill the Jars Place the cloves into sterilized glass jars. Add herbs or chili flakes if desired. 4. Pour the Brine Carefully pour the hot liquid over the garlic, ensuring the cloves are completely submerged. Leave about half an inch of space at the top. 5. Cool and Refrigerate Let the jars cool to room temperature before sealing. Store in the refrigerator for at least three weeks before tasting. The flavor deepens and improves over time, making patience worthwhile. How the Flavor Develops In the first few days, the garlic will still taste relatively sharp. After two weeks, it begins to mellow noticeably. By the third or fourth week, pickled garlic becomes smooth, tangy, and pleasantly aromatic. Occasionally, the cloves may turn slightly blue or green. This is a natural chemical reaction involving sulfur compounds and does not mean the batch is spoiled. As long as it smells fresh and remains refrigerated, it is safe to eat. For a creamy, zesty pairing, try our Cilantro Lime Crema — it complements bold flavors beautifully and adds a refreshing finish to any dish. Flavor Variations to Try One of the joys of preparing this recipe at home is experimentation. Here are a few variations: Spicy Version Add sliced jalapeños, whole peppercorns, or extra red pepper flakes. Herb-Infused Style Rosemary, thyme, oregano, or bay leaves give a Mediterranean touch. Sweet and Tangy Twist Use apple cider vinegar and increase sugar slightly for a softer flavor. Savory Asian-Inspired Option Add a splash of soy sauce and a pinch of sesame seeds for depth. These small changes allow you to personalize your jar while keeping the essential character intact. If you love vibrant herb-based blends, our Chimichurri Seasoning brings a fresh, savory depth that pairs wonderfully with tangy ingredients. Creative Ways to Use It Once your jar is ready, you’ll find endless ways to incorporate this ingredient into your cooking. Cheese Boards Whole cloves pair beautifully with aged cheeses, olives, and cured meats. Salad Dressings Finely chop and whisk into vinaigrettes for brightness. Sandwiches and Wraps Slice thinly and layer into grilled sandwiches for a tangy kick. Pasta and Grain Bowls Stir into warm dishes to add contrast and complexity. Sauces and Dips Blend into yogurt dips, hummus, or creamy spreads for subtle garlic flavor without harshness. Because the cloves are already tender, they integrate smoothly into both cold and warm dishes. Looking for a comforting side to balance bright flavors? Our Smashed Broccoli with Cheese makes the perfect rich and satisfying addition. Storage and Safety Proper handling is essential when preparing pickled garlic. Garlic preserved in oil at room temperature can be unsafe, so always use a vinegar-based method and keep it chilled. The Science Behind the Transformation Garlic contains sulfur compounds that create its pungent aroma. When exposed to acid, these compounds break down and soften. The vinegar environment also prevents harmful bacteria from developing. The occasional color change happens when sulfur interacts with trace minerals. While it may look unusual, it does not affect taste or safety. Understanding this simple chemistry helps explain why pickled garlic tastes milder yet still aromatic. Nutritional Overview Although the flavor profile changes, garlic retains many of its beneficial plant compounds. It remains low in calories and fat-free while adding bold taste to dishes without heavy sauces. However, because it contains salt from the brine, moderation is advisable for individuals monitoring sodium intake. Frequently Asked Questions Final Thoughts Homemade pickled garlic is one of the simplest ways to elevate everyday cooking. With just vinegar, salt, and fresh cloves, you create a pantry ingredient that adds brightness and sophistication to countless dishes. The transformation from sharp raw garlic to tangy preserved cloves is both practical and satisfying. Once you prepare your first jar, you may find yourself keeping it stocked year-round. Whether served on a cheese board, chopped

Pickled Garlic Recipe – Easy Homemade Tangy Garlic Cloves Read More »

Smashed Broccoli with Cheese

Smashed Broccoli with Cheese: A Crispy Oven-Roasted Recipe Full of Flavor

If you want a simple way to turn vegetables into something irresistible, smashed broccoli with cheese is a recipe you need to try. This modern cooking method transforms ordinary broccoli into crispy, golden bites that are packed with flavor. With tender centers and crunchy cheesy edges, smashed broccoli with cheese works beautifully as a side dish, appetizer, or healthy snack. Unlike traditional roasted vegetables, smashed broccoli with cheese uses a special technique that increases the surface area of each floret. By flattening the broccoli before roasting, you create more contact with the baking tray, allowing the cheese to melt and crisp into a delicious crust. The result is a dish that feels indulgent while still highlighting the natural goodness of broccoli. Why Smashed Broccoli with Cheese Is So Popular One of the reasons smashed broccoli with cheese has become such a popular recipe is its unique texture. Instead of soft or steamed vegetables, you get a combination of crispy edges and tender interiors. This contrast makes smashed broccoli with cheese appealing even to people who usually don’t enjoy vegetables. Another advantage is how easy the recipe is to prepare. With only a handful of ingredients, smashed broccoli with cheese delivers bold flavor without complicated techniques. Many home cooks love that it can be customized with different cheeses or seasonings while still keeping the same crispy base. Ingredients for the Best Smashed Broccoli with Cheese To make smashed broccoli with cheese at home, you only need a few simple ingredients. Main Ingredients Optional Add-Ins Using Parmesan cheese is often recommended because it melts quickly and forms a golden crust, which is essential for crispy smashed broccoli with cheese. Step-by-Step Instructions Step 1: Prepare the Broccoli Start by washing and trimming the broccoli. Cut the florets into medium-large pieces so they hold their shape when flattened. Bring a pot of water to a boil or prepare a steamer basket, then cook the broccoli until just fork-tender. This step softens the broccoli enough to create perfect smashed broccoli with cheese later. Once cooked, drain thoroughly and pat the broccoli dry. Removing excess moisture helps the smashed broccoli with cheese develop crispy edges during roasting. Step 2: Smash and Season Preheat your oven to 425°F (218°C) and line a baking sheet with parchment paper. Place the broccoli on the baking sheet, leaving space between each piece. Using the bottom of a glass or measuring cup, gently press each floret until flattened. Drizzle olive oil over the top and season with garlic powder, salt, and pepper. At this stage, you’ll begin to see how smashed broccoli with cheese takes shape. Step 3: Add Cheese and Roast Sprinkle Parmesan evenly across the smashed pieces. The cheese plays a major role in giving smashed broccoli with cheese its signature crispy texture. Roast for 15 to 25 minutes until the edges turn golden and slightly caramelized. The cheese should be bubbly and crisp, while the broccoli remains tender inside. Let the smashed broccoli with cheese cool for a few minutes before serving so the crust sets properly. Expert Tips for Perfect Smashed Broccoli with Cheese Dry the Broccoli Well Moisture is the main reason roasted vegetables fail to crisp. Always dry the florets thoroughly before preparing smashed broccoli with cheese. Avoid Overcrowding Spacing the pieces evenly allows hot air to circulate, helping the smashed broccoli with cheese roast instead of steam. Use High Heat A hotter oven encourages caramelization and gives smashed broccoli with cheese a richer flavor. ✨ If you enjoy bold, comforting flavors, you may also love our rich and savory Carne Con Chile recipe — a perfect complement to this dish. Flavor Variations to Try One of the best things about smashed broccoli with cheese is how adaptable it is. You can easily adjust the recipe to match different cuisines or dietary preferences. Lemon Garlic Style Add fresh lemon zest and extra garlic powder for a bright twist on smashed broccoli with cheese. Spicy Version Sprinkle chili flakes or cayenne pepper before roasting for a gentle heat that balances the cheese. Extra Cheesy Option Combine Parmesan with mozzarella or cheddar to create a softer melted layer while still keeping crispy edges. Herb-Infused Flavor Oregano, thyme, or Italian seasoning can give smashed broccoli with cheese a Mediterranean-inspired taste. ✨ For a creamy and satisfying appetizer idea, try our Cottage Cheese Spinach Artichoke Dip, a delicious option that pairs beautifully with roasted vegetables. Serving Ideas Because of its crispy texture, smashed broccoli with cheese can be served in many creative ways. It works just as well as a snack as it does as part of a full meal. This versatility is one of the reasons the recipe continues to grow in popularity. ✨ Looking for another crispy side dish? Our Potato O’Brien recipe brings golden texture and classic flavor to any meal. Nutritional Benefits Broccoli is naturally rich in vitamins, fiber, and antioxidants. When prepared as smashed broccoli with cheese, it becomes a satisfying dish that still supports balanced eating habits. Roasting instead of frying keeps the recipe lighter, while the cheese adds flavor and a small boost of protein. Because smashed broccoli with cheese uses simple ingredients, it can easily fit into many eating styles, including low-carb or balanced diets. Storage and Reheating Tips Although smasheed broccoli with cheese tastes best fresh from the oven, leftovers can still be enjoyable. Common Mistakes to Avoid Overcooking Before Smashing If the broccoli becomes too soft, smashedd broccoli with cheese may lose its structure during roasting. Using Too Much Oil A light drizzle is enough. Excess oil can make smashedd broccoli with cheese greasy instead of crispy. Skipping the Cheese Layer The cheese helps form the golden crust that makes smashed broccoli with cheese unique. Final Thoughts Smashedd broccoli with cheese proves that vegetables can be both delicious and exciting. By combining tender broccoli with a crispy cheese crust, this recipe transforms a simple ingredient into a dish that feels special. Whether you serve smashedd broccoli with cheese

Smashed Broccoli with Cheese: A Crispy Oven-Roasted Recipe Full of Flavor Read More »

Cottage Cheese Queso Dip

Cottage Cheese Queso Dip (Creamy, High-Protein & Easy)

Queso dip has long been a favorite comfort food. Creamy, cheesy, and endlessly scoopable, it shows up at parties, family gatherings, and casual weeknight meals. However, traditional versions are often heavy, overly rich, and lacking in nutritional balance. That’s why cottage cheese queso dip has become such a popular alternative. It delivers the same satisfying flavor and texture while offering a lighter, more protein-rich profile that fits effortlessly into modern eating habits. This updated take on queso transforms humble cottage cheese into a silky, indulgent dip that feels just as comforting as the classic version. Whether you’re hosting guests or preparing a quick snack, this recipe offers a perfect balance of flavor, texture, and nourishment. Why Cottage Cheese Is the Secret to a Better Queso At first glance, cottage cheese may seem like an unusual base for a queso-style dip. Yet once blended, it becomes remarkably smooth and creamy, making it ideal for sauces. The mild flavor allows spices and melted cheese to shine without overpowering the dish. What truly sets cottage cheese queso dip apart is its nutritional edge. Cottage cheese is naturally high in protein and lower in fat than many traditional cheese bases. This means the dip is more filling and satisfying, even in smaller portions. It’s comfort food that doesn’t feel heavy, making it suitable for both everyday meals and special occasions. Another advantage is versatility. Cottage cheese pairs beautifully with classic Tex-Mex seasonings, spicy peppers, and a wide range of cheeses, allowing you to customize the dip to your taste. Ingredients You’ll Need This recipe keeps things simple and accessible. Most ingredients are pantry staples, and substitutions are easy. Essential Ingredients Optional Flavor Boosters Using full-fat cottage cheese yields the creamiest cottage cheese queso dip, but lower-fat options can work if heated gently. How to Make Cottage Cheese Queso Dip The method is simple, but technique matters. Gentle heat and thorough blending are the keys to success. Step 1: Blend Until Smooth Add the cottage cheese to a blender or food processor and blend until completely smooth. The texture should resemble thick cream, with no visible curds remaining. Step 2: Add Cheese and Seasoning Transfer the blended cottage cheese to a saucepan or microwave-safe bowl. Stir in the shredded cheese and taco seasoning until evenly combined. Step 3: Heat Slowly Warm the mixture over low heat, stirring constantly. This prevents separation and ensures a smooth finish. If using a microwave, heat in short intervals, stirring between each one. Step 4: Adjust Texture and Taste Taste your cottage cheese queso dip and adjust seasoning as needed. Add a splash of milk if you prefer a thinner consistency. Step 5: Serve Warm Serve immediately while warm for the best texture and flavor. If you enjoy creamy, protein-rich dips with a refined twist, you may also appreciate our cottage cheese spinach artichoke dip. Tips for Perfect Texture Every Time Even an easy recipe can benefit from a few expert tips: These small details make a big difference in achieving a smooth, restaurant-quality cottage cheese queso dip. Flavor Variations to Explore Once you master the base recipe, experimenting becomes part of the fun. Spicy Version Add chopped jalapeños or hot sauce for a bold kick. Smoky Queso Incorporate smoked paprika and roasted green chiles for deeper flavor. Chunky Tex-Mex Style Fold in diced tomatoes or fresh salsa after heating. Hearty Protein Boost Mix in seasoned ground meat to turn your cottage cheese queso dip into a meal-worthy sauce. Each variation keeps the base creamy while introducing new layers of flavor. For those who love a touch of heat balanced with creaminess, our cottage cheese buffalo chicken dip is another flavorful option worth exploring. Nutritional Advantages Compared to traditional queso, this dip offers meaningful benefits: Because it’s protein-rich, cottage cheese queso dip works well as a snack, appetizer, or even a post-workout option. And to finish on a sweet note, our cranberry pistachio shortbread cookies make a beautifully balanced dessert alongside any savory spread. How to Serve Cottage Cheese Queso Dip This dip is incredibly versatile and fits into many meals. Classic Dipping Options As a Sauce For Entertaining Serve cottage cheese queso dip warm in a heat-safe dish or small slow cooker to maintain its creamy texture throughout the event. Storage and Reheating Leftovers store well with proper handling. Handled correctly, the dip retains its smooth texture and rich flavor. Why This Recipe Belongs in Your Kitchen Cottage cheese queso dip proves that comfort food can be both indulgent and balanced. It’s quick to make, easy to customize, and satisfying without being heavy. Whether you’re serving it at a party or enjoying a quiet snack at home, this dip delivers creamy texture and bold flavor every time. Once you try cottage cheese queso dip, it’s hard not to appreciate how seamlessly it fits into everyday cooking. It offers everything you love about queso — with a lighter, smarter twist. This article has been enriched by insights drawn from trusted external resources, offering additional perspective on the topic

Cottage Cheese Queso Dip (Creamy, High-Protein & Easy) Read More »

Pistachio Syrup

Pistachio Syrup: A Complete Homemade Guide for Drinks, Desserts, and Creative Recipes

Pistachio syrup is one of those ingredients that instantly elevates any recipe it touches. With its delicate nutty aroma, subtle sweetness, and luxurious character, it has become a favorite in coffee shops, home kitchens, and dessert studios around the world. Whether stirred into a warm latte, drizzled over pancakes, or blended into a milkshake, pistachio syrup brings depth and elegance that few other flavored syrups can match. In this article, you will discover everything you need to know about pistachio syrup: what it is, how to make it at home, expert techniques for perfect flavor, variations to suit different lifestyles, and the many delicious ways to use it. What Is Pistachio Syrup? Pistachio syrup is a sweet, nut-infused liquid made by combining sugar, water, and pistachios. During gentle cooking, the pistachios release their natural oils and flavor compounds into the syrup, creating a smooth and aromatic result. Unlike artificial nut syrups, a well-made pistachio syrup delivers a natural taste that feels rich but balanced. Its texture is slightly thicker than simple syrup, making it ideal for beverages, desserts, and sauces. The flavor profile is soft, creamy, and mildly roasted, with a sweetness that complements rather than overwhelms other ingredients. Why Make Pistachio Syrup at Home? Making pistachio syrup at home gives you full control over quality and flavor. Many commercial syrups rely heavily on artificial coloring and flavoring, while homemade versions highlight real pistachios as the star ingredient. Homemade pistachio syrup allows you to: For anyone who values flavor and simplicity, homemade pistachio syrup is an excellent kitchen staple. Ingredients Needed A classic pistachio syrup recipe requires only a few ingredients, yet each one plays an essential role: Choosing fresh pistachios with a pleasant aroma is key to achieving a high-quality syrup. Step-by-Step Method 1. Prepare the Pistachios Roughly chop the pistachios to expose their interior. This helps release flavor during cooking. 2. Combine Ingredients Add sugar, water, and pistachios to a saucepan and stir gently. 3. Heat Gently Bring the mixture to a boil over medium heat, stirring until the sugar is fully dissolved. 4. Simmer Slowly Reduce the heat and let the mixture simmer for 8–10 minutes. This step allows the pistachio flavor to infuse deeply into the syrup. 5. Rest for Infusion Remove from heat and let the syrup sit for about 15 minutes to intensify the flavor. 6. Strain Strain through a fine mesh sieve or cheesecloth, pressing lightly to extract all liquid. 7. Cool and Store Once cooled, pour the pistachio syrup into a clean bottle and refrigerate. For a richer pistachio experience, you may also enjoy our homemade pistachio sauce recipe, perfect for desserts and drinks. Flavor and Texture Characteristics Properly prepared pistachio syrup should be smooth, lightly thick, and glossy. The taste is gently sweet with a clear pistachio presence that feels creamy rather than heavy. The color may range from pale gold to light green depending on the pistachios used. As it cools, the syrup naturally thickens, making it ideal for both hot and cold applications. Pistachio Syrup Variations Sugar-Free Option Use a sugar substitute designed for cooking. A small amount of thickener can help replicate traditional texture. Extra-Rich Version Blending the syrup briefly before straining extracts more nut oils, producing a more intense pistachio flavor. Lightly Aromatic Version A touch of vanilla or almond extract enhances depth without overpowering the pistachio. Each variation allows pistachio syrup to adapt to different dietary needs and flavor preferences. If you love natural sweetness, don’t miss our strawberry jam without pectin, made with simple ingredients and pure fruit flavor. How to Use Pistachio Syrup Coffee and Hot Drinks Pistachio syrup pairs beautifully with espresso, cappuccino, and lattes. It adds warmth and a refined nutty sweetness. Iced Beverages It dissolves easily in iced coffee, cold brew, and iced milk drinks, creating a refreshing yet indulgent result. Desserts Drizzle pistachio syrup over ice cream, waffles, pancakes, or yogurt. It also works well in dessert sauces and glazes. Baking Use it to flavor cake layers, frostings, or pastry fillings for a subtle pistachio note. Cocktails and Mocktails Pistachio syrup brings originality to drinks, especially creamy or nut-based beverages. For a unique and refreshing pairing, try our banana matcha recipe, a smooth blend that works beautifully with nutty flavors. Expert Tips for Best Results Attention to detail ensures consistently excellent pistachio syrup. Pistachio Syrup Compared to Other Flavored Syrups Unlike vanilla or caramel syrups, pistachio syruup offers complexity from natural nut oils. It provides body as well as sweetness, acting as both a flavor enhancer and textural element. This makes it feel more luxurious, even when used sparingly. Its versatility allows it to shine in both simple and elaborate recipes. Why Pistachio Syrup Is So Popular The growing interest in specialty coffee and homemade gourmet recipes has brought pistachio syruup into the spotlight. Its unique flavor, elegant appearance, and wide range of uses make it appealing to both professionals and home cooks. As people seek more natural and distinctive flavors, pistachio syrup continues to stand out as a refined yet comforting choice. Final Thoughts Pistachio syruup is a simple ingredient with remarkable impact. Made from just a few components, it transforms drinks and desserts into memorable creations. Preparing pistachio syrup at home allows you to enjoy authentic flavor, customize sweetness, and elevate everyday recipes with ease. Once you add pistachio syruup to your kitchen, it quickly becomes an indispensable so favorite. This article draws inspiration from trusted culinary references, including detailed guides such as as this pistachio syrup resource.

Pistachio Syrup: A Complete Homemade Guide for Drinks, Desserts, and Creative Recipes Read More »

banana syrup for coffee

Banana Syrup for Coffee (Easy Homemade Café-Style Recipe)

Banana syrup for coffee is a unique and comforting way to add natural sweetness and depth to your favorite coffee drinks. Smooth, aromatic, and gently spiced, this homemade syrup transforms ordinary coffee into a café-style experience without relying on artificial flavors or preservatives. Made from ripe bananas and simple pantry ingredients, it delivers a warm, bakery-inspired taste that feels indulgent yet balanced. In recent years, flavored coffee syrups have become increasingly popular, especially among home baristas looking to recreate specialty drinks at home. Banana syrup for coffee stands out because it offers something different from classic vanilla or caramel. Its flavor is soft, rounded, and naturally sweet, making it ideal for both hot and iced coffee drinks. What Is Banana Syrup for Coffee? Banana syrup for coffee is a fruit-based syrup created by simmering ripe bananas with a sweetener and water until the flavors concentrate into a smooth, pourable liquid. Unlike commercial syrups that rely on extracts, this version uses real bananas, which gives it depth, authenticity, and a naturally rich aroma. The purpose of banana syrup for coffee is not to overpower the drink, but to enhance it. When used correctly, it blends seamlessly with coffee, adding subtle sweetness and a comforting note reminiscent of banana bread or caramelized fruit. Its texture allows it to dissolve easily into hot espresso or cold beverages without separating. Because it is made from real ingredients, banana syrup for coffee offers a fresher, more nuanced flavor than many store-bought alternatives. Why Banana Works So Well in Coffee Coffee naturally contains bitter, roasted, and sometimes chocolatey notes. These flavors benefit from gentle sweetness and warmth. Banana syrup for coffee complements coffee because ripe bananas contain natural sugars and mild caramel tones that soften bitterness without masking the coffee itself. When combined with vanilla and cinnamon, banana syrup develops a flavor profile that feels cozy and familiar. It pairs particularly well with creamy textures, which is why it shines in lattes, cappuccinos, and iced milk-based drinks. Even in black coffee or cold brew, a small amount of banana syrup for coffee can round out sharp edges and create balance. This harmony between fruit sweetness and roasted coffee makes banana syrup a surprisingly elegant addition. Ingredients for Banana Syrup for Coffee This recipe relies on simple, accessible ingredients. The quality of your bananas is the most important factor. Ingredients Optional additions include nutmeg, allspice, or a cinnamon stick for extra warmth. These ingredients work together to create a balanced banana syrup for coffee that is flavorful without being heavy. How to Make Banana Syrup for Coffee Making banana syrup for coffee is quick and straightforward, even for beginners. The process takes about ten minutes. Step 1: Prepare the Bananas Peel the bananas and mash them thoroughly in a bowl. The riper the bananas, the sweeter and more aromatic the syrup will be. Step 2: Combine Ingredients Place the mashed bananas, sweetener, water, cinnamon, and salt into a small saucepan. Stir gently to combine. Step 3: Simmer Heat the mixture over medium heat until it reaches a gentle simmer. Stir occasionally and allow it to cook for 5 to 7 minutes. During this time, the flavors will blend and the liquid will slightly thicken. Step 4: Add Vanilla Remove the saucepan from heat and stir in the vanilla extract. This step enhances the aroma and smoothness of the banana syrup for coffee. Step 5: Strain For a smooth, professional texture, strain the syrup through a fine mesh sieve. Press gently to extract as much liquid as possible. Step 6: Cool and Store Let the syrup cool completely before transferring it to a clean glass container. As it cools, the banana syrup for coffee will thicken slightly. If you enjoy creamy, nut-forward flavors, you may also love our pistachio sauce recipe, which adds a rich and elegant touch to both drinks and desserts How to Use Banana Syrup for Coffee Once prepared, banana syrup for coffee can be used in many different ways. Hot Banana Latte Add one to two tablespoons of banana syrup for coffee to a cup of espresso. Top with steamed milk and stir gently. This creates a comforting, café-style drink. Iced Coffee Pour cold coffee or cold brew over ice, add banana syrup for coffee, and finish with milk or a plant-based alternative. The result is refreshing and smooth. Cold Brew Stir banana syrup for coffee directly into cold brew to soften its boldness while maintaining its strength. Dessert-Style Drinks Banana syrup pairs well with chocolate or cocoa, creating rich drinks reminiscent of dessert coffees. Start with a small amount and adjust according to taste. Banana syrup for coffee is naturally sweet, so moderation is key. For another homemade classic, our strawberry jam made without pectin is a beautiful example of how simple ingredients can deliver pure, authentic flavor Variations of Banana Syrup for Coffee One of the advantages of banana syrup for coffee is how easy it is to customize. Caramelized Banana Version Lightly caramelize the bananas with sugar before adding water. This creates a deeper, more intense flavor. Banana Bread Style Add nutmeg and extra cinnamon to mimic the taste of banana bread. Vegan Option Use maple syrup or coconut sugar to keep the recipe fully plant-based. Each variation keeps the essence of banana syrup for coffee while offering a slightly different experience. If you’re curious about unique café-style combinations, our banana matcha recipe offers a smooth and modern twist that pairs wonderfully with natural sweetness. Storage and Shelf Life Because it contains fresh fruit, banana syrup for coffee should be stored in the refrigerator. Use an airtight container and consume within 4 to 5 days. If the syrup thickens too much when cold, warm it slightly or stir in a small amount of water or coffee before use. Tips for Best Results These small details make a noticeable difference in the final banana syrup for coffee. Beyond Coffee Uses Although designed for coffee, banana syrup can also be drizzled over

Banana Syrup for Coffee (Easy Homemade Café-Style Recipe) Read More »

Strawberry Jam Without Pectin

Strawberry Jam Without Pectin: A Traditional Homemade Recipe Worth Mastering

Homemade jam has a special place in the kitchen, especially when it is prepared using simple, time-honored methods. Making strawberry jam without pectin allows the natural flavor of fresh strawberries to take center stage while avoiding artificial thickeners. This approach relies on careful cooking, the right balance of sugar and acidity, and a bit of patience. The result is a jam that tastes fresher, richer, and more authentic than many commercial alternatives. This guide will walk you through every step of the process, from ingredient selection to storage tips, helping you achieve a perfect homemade jam with a smooth, spreadable texture and vibrant strawberry flavor. Why Make Jam Without Added Pectin? Traditional jam recipes existed long before commercial pectin became widely available. In those methods, fruit, sugar, and acid worked together naturally to create a thick preserve. Strawberry jam without pectin follows this classic technique, producing a softer and more luxurious texture that many people prefer. There are several reasons why this method remains popular: This style of jam is especially appealing for those who enjoy cooking from scratch and value simple, traditional preparations. How Jam Thickens Naturally To understand why strawberry jam without pectin works, it helps to know what causes jam to set. Three elements are essential: Strawberries are naturally low in pectin, so longer cooking and the addition of lemon juice are necessary. As the mixture simmers, water evaporates, sugars concentrate, and the jam thickens gradually. The final texture sets more firmly as it cools. Ingredients You Will Need The success of this recipe depends on ingredient quality more than quantity. Core Ingredients Optional Enhancements Each ingredient plays a specific role in achieving the ideal balance for strawberry jam without pectin. Selecting the Best Strawberries Choose strawberries that are fully ripe, bright red, and fragrant. Ripe berries provide natural sweetness and better flavor concentration. Avoid underripe strawberries, which lack sweetness, or overly soft berries, which can release excess water and affect consistency. High-quality fruit is the foundation of excellent strawberry jam without pectin, so seasonal, locally sourced strawberries often produce the best results. Step-by-Step Cooking Instructions Step 1: Prepare the Fruit Wash the strawberries thoroughly, remove the stems, and chop them into evenly sized pieces. Smaller pieces break down more easily during cooking. Step 2: Combine with Sugar Place the strawberries in a large bowl and mix with the sugar. Let the mixture rest for 30 to 45 minutes. This process draws out the juices and begins dissolving the sugar, which helps prevent crystallization during cooking. Step 3: Add Lemon Juice Stir in the lemon juice just before cooking. This step is essential for flavor balance and proper thickening. Step 4: Cook Slowly Transfer the mixture to a heavy-bottomed pot and cook over medium heat, stirring frequently until the sugar fully dissolves. Once boiling begins, reduce the heat slightly and allow the mixture to simmer uncovered. As it cooks, the mixture will foam and thicken. Stir regularly to prevent sticking or burning. This stage is crucial for developing the correct texture for strawberry jam without pectin. Step 5: Test for Set To test doneness, place a small spoonful of jam on a chilled plate. After a few seconds, push it gently with your finger. If it wrinkles and holds its shape, the jam is ready. Step 6: Jar and Cool Remove the pot from heat and allow the jam to rest briefly. Spoon into clean jars, leaving a small gap at the top. Seal and allow to cool completely at room temperature. What Texture to Expect Unlike commercial jams, strawberry jam without pectin has a softer, more natural consistency. It spreads easily but is not stiff or rubbery. The jam continues to thicken as it cools and reaches its final texture after several hours. This softer set is ideal for toast, pastries, yogurt, and baking. For an extra layer of richness, try our homemade pistachio paste, a smooth and flavorful recipe that elevates both desserts and sauces. Common Mistakes and How to Avoid Them Cooking Too Quickly High heat can cause burning and uneven thickening. Moderate heat ensures steady evaporation. Skipping Acid Without enough acidity, strawberry jam without pectin may remain runny. Under-Cooking Jam that appears thick while hot may loosen once cooled. Always perform a set test. Over-Cooking Excessive boiling can create a sticky or overly dense texture. If you enjoy light, crisp textures, our wafer cookies recipe is a delicate classic that pairs beautifully with jams and creams. Storage and Shelf Life Refrigeration Stored in an airtight container, the jam keeps well in the refrigerator for up to four weeks. Freezing Jam freezes successfully for several months. Leave room in containers for expansion. Pantry Storage When properly sealed using traditional canning methods, strawberry jam without pectin can be stored for up to one year in a cool, dark place. To enhance this recipe with a nutty twist, don’t miss our pistachio sauce, a creamy and versatile addition that brings depth and elegance to sweet creations Serving Ideas This jam pairs beautifully with many dishes: The pure fruit flavor of strawberry jam without pectin enhances both simple breakfasts and elegant desserts. Flavor Variations Once comfortable with the base recipe, try small variations: Each variation preserves the integrity of strawberry jam without pectin while offering subtle changes in flavor and texture. Nutritional Perspective Homemade jam contains real fruit and sugar with no artificial additives. While it should be enjoyed in moderation, strawberry jam without pectin provides natural antioxidants and vitamin C from fresh strawberries. Frequently Asked Questions Can you can strawberry jam without pectin? Yes, you can safely can strawberry jam without pectin as long as it contains enough sugar and acid and is processed correctly. Proper sealing and cleanliness are essential for safe storage. Can you make jam without pectin? Yes, jam can be made without pectin by cooking fruit with sugar and acid until it naturally thickens. The process relies on evaporation and concentration rather than added gelling agents. How do I thicken my

Strawberry Jam Without Pectin: A Traditional Homemade Recipe Worth Mastering Read More »

Volcano Sauce

Copycat Taco Bell Volcano Sauce Recipe : How to Make the Famous Spicy Cheese Sauce at Home

If you are a fan of bold flavors and creamy heat, volcano sauce is probably already on your radar. This iconic spicy cheese sauce became famous thanks to Taco Bell’s Volcano menu, where it added an intense kick to tacos, burritos, and nachos. While the original version isn’t always available, the good news is that you can recreate a delicious homemade version that captures the same fiery, cheesy spirit. In this article, you’ll learn exactly what makes volcano sauce so special, how to prepare it step by step at home, and how to use it in a variety of dishes. This recipe is inspired by popular copycat techniques shared across the internet, adapted for home kitchens and everyday ingredients. What Is Volcano Sauce? Volcano sauce is a creamy, spicy cheese sauce known for its smooth texture and bold heat. It combines melted cheese with chili peppers, spices, and a touch of acidity to create a balanced yet powerful flavor. Unlike regular cheese sauce, volcano sauce delivers a noticeable kick that builds gradually rather than overwhelming your palate. What makes volcano sauce unique is the combination of cheesiness and heat. The spice doesn’t mask the cheese; instead, it enhances it, making the sauce addictive and versatile. It works equally well as a topping, a dip, or a spread. Why Make Volcano Sauce at Home? Making volcano sauce at home gives you complete control over: Homemade volcano sauce is also budget-friendly and customizable. Whether you want to use fresh peppers, adjust the seasoning, or adapt it to what you already have in your kitchen, this recipe is flexible and forgiving. Ingredients for Homemade Volcano Sauce To make a rich and flavorful volcano sauce, you’ll need the following ingredients: These ingredients work together to recreate the signature taste of volcano sauce: creamy, spicy, slightly tangy, and deeply savory. Step-by-Step Volcano Sauce Recipe Step 1: Roast the Peppers Preheat your oven to 200°C (400°F). Slice the peppers in half and remove the seeds if you prefer less heat. Place them on a baking tray and roast for about 12–15 minutes until softened and lightly charred. Roasting enhances the flavor and adds depth to the volcano sauce. Step 2: Prepare the Base Add the roasted peppers to a blender or food processor. Pour in the nacho cheese sauce while the peppers are still warm to help everything blend smoothly. Step 3: Season the Sauce Add garlic powder, onion powder, paprika, cayenne pepper, sugar, apple cider vinegar, and a pinch of salt. These seasonings are essential for achieving that authentic volcano sauce taste. Step 4: Blend Until Smooth Blend everything until the mixture is completely smooth. Add water or milk gradually to reach your desired consistency. Volcano sauce should be creamy and pourable, not runny. Step 5: Adjust and Rest Taste the sauce and adjust salt or spice if needed. Let the volcano sauce rest for 10–15 minutes before serving to allow the flavors to fully develop. For a fresh, herb-forward contrast, try our homemade chimichurri seasoning—it pairs beautifully with bold, spicy flavors. How Spicy Is Volcano Sauce? Volcano sauce is designed to be noticeably spicy but still enjoyable. The heat level depends mainly on the type and quantity of peppers used. Serrano peppers create a more authentic heat, while jalapeños offer a milder version. If you love extra spice, you can: If you prefer a gentler volcano sauce, reduce the peppers and increase the cheese slightly. Best Ways to Use Volcano Sauce One of the biggest advantages of volcanoo sauce is its versatility. Here are some popular ways to enjoy it: Once you start using volcano sauce, you’ll find countless ways to incorporate it into your meals. If you enjoy rich, smoky dishes, our classic discada recipe is another must-try for hearty, flavor-packed meals. Storage and Shelf Life Homemade volcanoo sauce can be stored in an airtight container in the refrigerator for up to 5–7 days. Before using leftovers, stir well or gently reheat on low heat to restore its creamy texture. Avoid freezing, as the cheese base may separate when thawed. Tips for the Perfect Volcano Sauce These small steps make a big difference in achieving restaurant-style volcanoo sauce at home. To balance the heat with something cool and creamy, our cilantro lime crema is a perfect finishing touch. Frequently Asked Questions Final Thoughts Volcanoo sauce is more than just a spicy cheese topping—it’s a flavor experience. Creamy, bold, and packed with heat, it transforms simple dishes into something exciting. By making volcano sauce at home, you get all the flavor you love with the freedom to customize it to your taste. Whether you’re recreating a nostalgic favorite or discovering it for the first time, this homemade volcano sauce recipe delivers the perfect balance of spice and comfort. Once you try it, it’s likely to become a staple in your kitchen. watch the video

Copycat Taco Bell Volcano Sauce Recipe : How to Make the Famous Spicy Cheese Sauce at Home Read More »

Chimichurri Seasoning

Chimichurri Seasoning: A Fresh, Bold Flavor That Transforms Any Dish

Introduction: My Experience With Chimichurri Seasoning The first time I made Chimichurri Seasoning, I was looking for something simple yet powerful to elevate grilled vegetables and proteins without relying on heavy sauces. I wanted a recipe that felt fresh, balanced, and versatile enough to use across different meals. From the very first taste, I understood why this seasoning is so beloved. The combination of fresh herbs, garlic, olive oil, and acidity created an explosion of flavor that instantly made even the simplest dish feel special. What I personally love about Chimichurri Seasoning is how quickly it comes together and how adaptable it is. I’ve used it with grilled chicken, roasted vegetables, grain bowls, and even as a dip for bread. Each time, it delivers brightness, depth, and freshness without overpowering the food. Over time, this seasoning became a staple in my kitchen, especially when I want maximum flavor with minimal effort. What Is Chimichurri Seasoning? Chimichurri Seasoning is a fresh, herb-based mixture traditionally used to enhance grilled foods. It is uncooked and relies on high-quality ingredients to deliver its signature bold and vibrant taste. While often described as a sauce, chimichurri also functions perfectly as a seasoning because it coats, marinates, and finishes food with intense flavor. The base of chimichurri consists of parsley, garlic, olive oil, vinegar, and dried herbs, with optional spices to add warmth or heat. The result is a seasoning that is tangy, herbaceous, slightly spicy, and deeply aromatic. Unlike creamy sauces, chimichurri feels light and refreshing, making it suitable for both rich and delicate dishes. Essential Ingredients for Chimichurri Seasoning Making this Seasoning requires simple, accessible ingredients, but freshness is key. High-quality components make a noticeable difference in the final result. Fresh parsley is the foundation of the seasoning, giving it its vibrant green color and fresh herbal taste. Garlic adds intensity and character, while extra-virgin olive oil acts as the carrier that brings all the flavors together. Vinegar provides the necessary acidity that keeps the seasoning lively and balanced. Dried oregano contributes an earthy note, while red pepper flakes add a subtle heat that can be adjusted to taste. Smoked paprika is optional but adds depth and a gentle smoky undertone. Salt is essential for enhancing and unifying all the flavors. How to Make Chimichurri Seasoning One of the biggest advantages of Chimichurri Seasoning is how easy it is to prepare. There is no cooking involved, which preserves the freshness of the ingredients. Start by whisking together olive oil, vinegar, minced garlic, salt, dried oregano, red pepper flakes, and smoked paprika in a bowl. This step allows the flavors to begin blending before the herbs are added. Next, stir in finely chopped fresh parsley until evenly distributed throughout the mixture. Taste the seasoning and adjust the salt or acidity as needed. The final texture should be slightly loose, spoonable, and glossy, with visible pieces of herbs and garlic. Once mixed, the seasoning is ready to use immediately. How Chimichurri Seasoning Enhances Different Dishes Chimichurri Seasoning is incredibly versatile and can be used in many ways beyond its traditional pairing with grilled meats. Grilled and Roasted Foods Chimichurri is famously paired with grilled steak, but it works just as well with chicken, lamb, fish, and shrimp. Spoon it over hot food just before serving to allow the warmth to release its aromas. It also pairs beautifully with roasted vegetables like potatoes, carrots, zucchini, and cauliflower. Vegetarian and Plant-Based Meals For vegetarian dishes, Chimichurri Seasoning adds complexity and freshness. It enhances grilled tofu, roasted chickpeas, lentils, and vegetable skewers. It can also be mixed into grain bowls with quinoa, rice, or farro to add brightness and depth. Salads, Bowls, and Light Dishes Chimichurri can double as a dressing when slightly thinned with extra vinegar or lemon juice. Toss it with fresh salads, bean salads, or pasta salads for a bold, herb-forward flavor. It also works well drizzled over eggs, avocado toast, or roasted sweet potatoes. Dips, Spreads, and Marinades Use Chimichurri Seasoning as a dipping sauce for bread or as a spread for sandwiches and wraps. It also makes an excellent marinade, as the acidity helps tenderize proteins while infusing them with flavor. Tips for Perfect Chimichurri Seasoning To get the best results, always use fresh parsley rather than dried. Chop the herbs finely but not into a paste to preserve texture. Allow the seasoning to rest for 10–15 minutes before serving so the flavors can fully develop. If storing the seasoning, keep it in an airtight container in the refrigerator. While it is best enjoyed fresh, it can be stored for up to four days. Bring it back to room temperature before serving to restore its full flavor. Why Chimichurri Seasoning Belongs in Your Kitchen Chimichurri Seasoning is more than just a recipe—it is a technique for adding freshness, balance, and intensity to everyday meals. It requires minimal time, simple ingredients, and no cooking, yet delivers restaurant-quality flavor. From my own experience, once you start using chimichurri regularly, it becomes difficult to imagine cooking without it. It elevates basic dishes, encourages creativity in the kitchen, and brings a vibrant, fresh element to any meal. Whether you are grilling, roasting, or assembling a quick bowl, chimichurri is a seasoning that never disappoints. Frequently Asked Questions Take a look to other recipes in our Sitweb like Pistachio Sauce and Cilantro Lime Crema This Recipe based on this sitweb

Chimichurri Seasoning: A Fresh, Bold Flavor That Transforms Any Dish Read More »