Pink Salt Trick Recipe: A Complete Guide to This Simple Wellness Drink
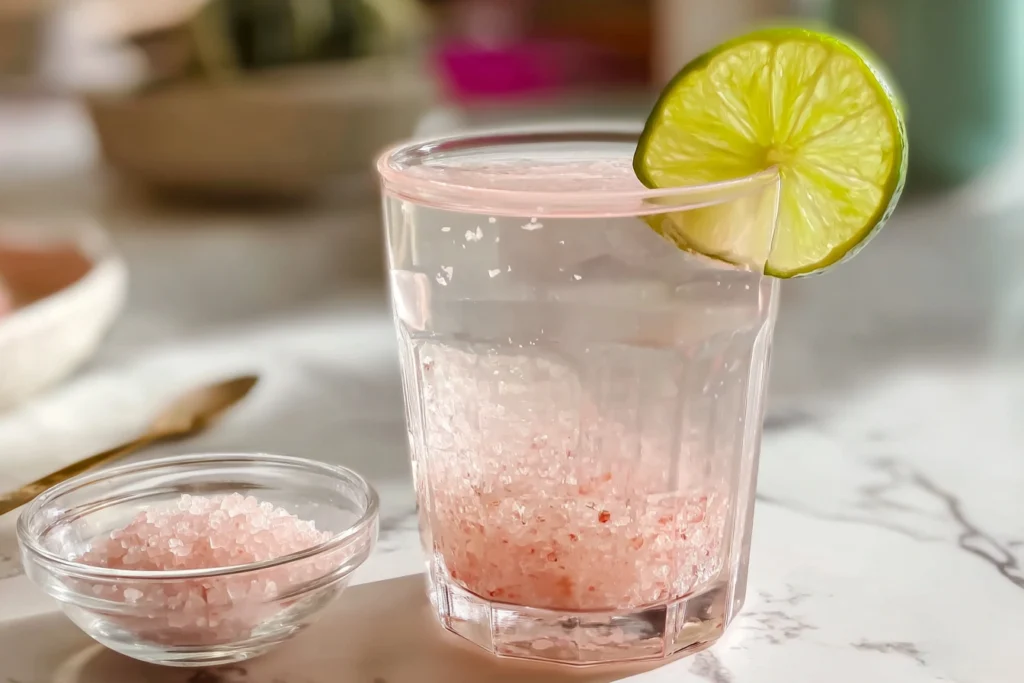
The pink salt trick recipe has quickly become a popular wellness habit, especially among people interested in hydration, fasting, and simple morning routines. This recipe stands out because of its minimal ingredients, ease of preparation, and compatibility with low-calorie or fasting lifestyles. Unlike complex detox drinks or supplement-based solutions, this approach relies on a basic combination of water and Himalayan pink salt. In this article, we’ll explore what the pink salt trick recipe really is, how to prepare it correctly, what it can and cannot do for your body, and how to use it safely. The goal is to provide clear, realistic information without exaggerated claims. What Is the Pink Salt Trick Recipe? The pink salt trick recipe is a simple drink made by dissolving a small amount of Himalayan pink salt in water. It is often consumed in the morning or during fasting periods to support hydration and electrolyte balance. Because it contains no calories when prepared correctly, it fits well into fasting routines and low-calorie lifestyles. The term “trick” refers to how such a small change — adding a pinch of salt to water — can noticeably improve how some people feel, especially when they experience headaches, fatigue, or lightheadedness related to dehydration. Why Himalayan Pink Salt Is Used Himalayan pink salt is chosen for the pink salt trick recipe because it is minimally processed and contains trace minerals. While the main component is still sodium chloride, pink salt also includes very small amounts of minerals such as magnesium, potassium, and calcium. These minerals are present in trace quantities and should not be considered a major nutritional source. However, sodium itself plays a critical role in fluid balance, nerve function, and muscle contraction. This is why the pink salt trick recipe is often described as a gentle electrolyte drink rather than a detox solution. Does the Pink Salt Trick Recipe Break a Fast? One of the main reasons people use the pink salt trick recipe is because it does not break a fast when prepared without caloric ingredients. Salt contains no carbohydrates, proteins, or fats, and therefore does not trigger insulin release. For individuals practicing intermittent fasting, this recipe may help reduce common fasting side effects such as fatigue, dizziness, and headaches. As long as no sweeteners or caloric additives are included, the pink salt trick recipe remains fasting-friendly. Basic Pink Salt Trick Recipe (Classic Version) Here is the most common and simplest version of the pink salt trick recipe. Ingredients Instructions This version contains zero calories and is suitable for daily use in moderation. Optional Variations of the Pink Salt Trick Recipe Although the classic version is the most popular, some people adjust the pink salt trick recipe based on taste or routine. Warm Water Version Using warm water instead of cold can make the drink more comfortable, especially first thing in the morning. Lemon Flavor Version A few drops of lemon juice or lemon zest may improve taste. This version is usually avoided during strict fasting. Vinegar Version Some people add a small amount of apple cider vinegar for flavor. This variation is best used outside fasting periods. All variations should still follow the principle of moderation. If you’re curious about other simple wellness drinks gaining attention, you may also enjoy exploring our gelatin-based trick designed to support healthy weight-management routines. What the Pink Salt Trick Recipe Can Realistically Do It is important to have realistic expectations. The pink salt trick recipe can be helpful, but it is not a miracle solution. 1. Supports Hydration Sodium helps the body retain water, which may improve hydration status for people who drink large amounts of plain water. 2. Helps Maintain Electrolyte Balance During fasting or heavy sweating, sodium levels can drop. The pink salt trick recipe can help restore balance. 3. May Reduce Fasting Discomfort Some people report fewer headaches and improved energy levels when using this recipe during fasting. For readers interested in alternative household-ingredient approaches, we’ve also shared a detailed guide on the baking soda trick that has become popular among men. What the Pink Salt Trick Recipe Cannot Do Despite online claims, the pink salt trick recipe does not: Any perceived benefits are usually indirect and related to hydration and routine consistency. Those drawn to mineral-based remedies may want to discover our Celtic salt trick, which follows a similarly minimalist and hydration-focused philosophy. Pink Salt Trick Recipe and Weight Loss The pink salt trick recipe is often associated with weight loss, but salt itself does not cause fat loss. However, the recipe may support weight-loss efforts indirectly by reducing dehydration-related hunger and helping people stick to fasting or calorie-controlled plans. Weight loss ultimately depends on overall diet, activity, and lifestyle habits. Who Should Be Cautious While generally safe for many people, the pink salt trick recipe may not be appropriate for everyone. Extra caution is advised for individuals with: In these cases, medical guidance is recommended. How Often Should You Use the Pink Salt Trick Recipe? For most people, once per day is sufficient. The most common time is in the morning or during fasting. Using the pink salt trick recipe multiple times per day is not recommended, as excessive sodium intake can be harmful. Common Mistakes to Avoid To use the pink salt trick recipe safely, avoid: Moderation is essential. Frequently Asked Questions Final Thoughts The pink salt trick recipe is a simple and affordable hydration tool. When used correctly, it may help support hydration and electrolyte balance, especially during fasting or low-calorie routines. However, it is not a cure-all and should not replace balanced nutrition or medical advice. Used responsibly, the pink salt trick recipe can be a small but helpful part of a healthy routine.
Pink Salt Trick Recipe: A Complete Guide to This Simple Wellness Drink Read More »