diamondmeals.com

drsoukainaelaziz@gmail.com

Snow Crab Legs

Snow Crab Legs with Garlic Butter: A Simple and Elegant Seafood Recipe

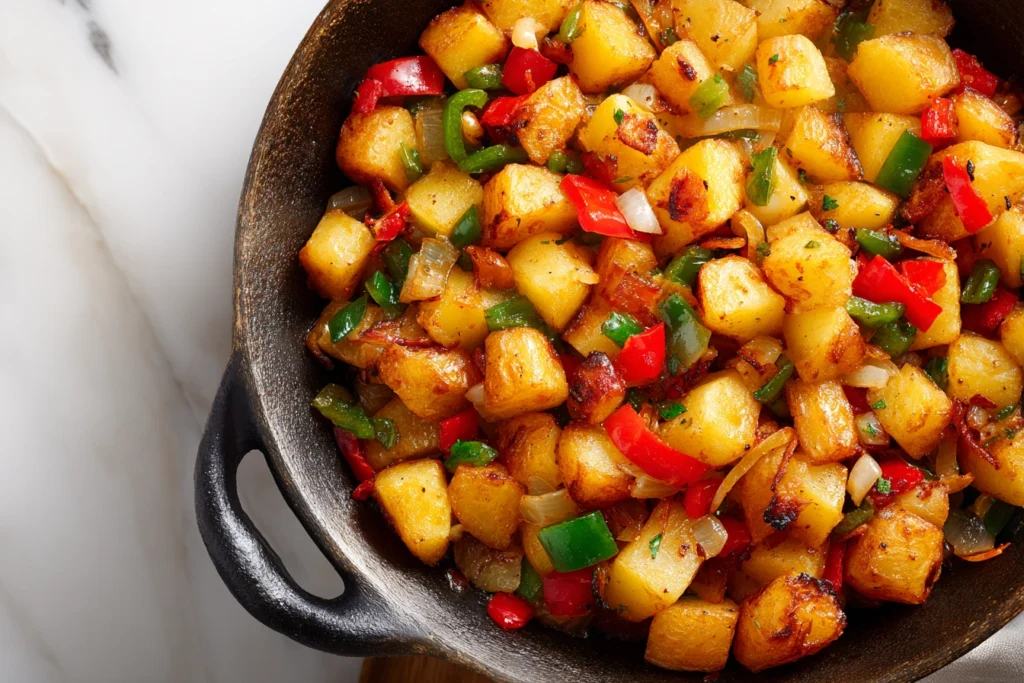
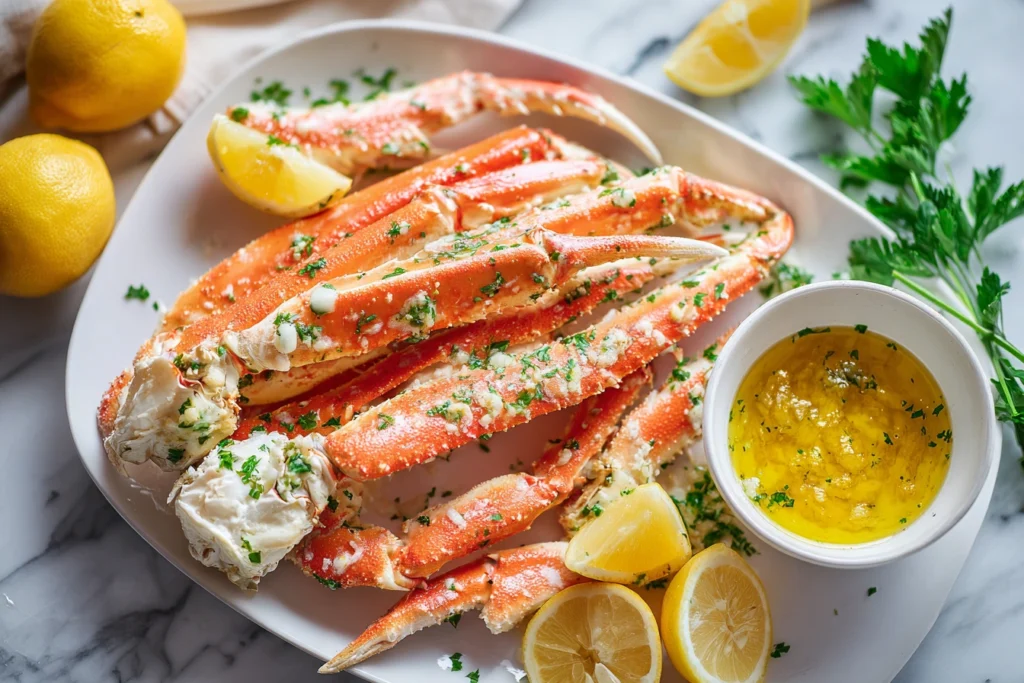
Snow crab legs are one of the easiest seafood dishes to prepare at home while still feeling luxurious and special. Their naturally sweet flavor, tender texture, and quick cooking time make them a favorite for both beginners and experienced cooks. Many people assume seafood requires advanced skills, but snow crab legs prove that a restaurant-style meal can be simple and stress-free. In this guide, you will learn how to prepare a classic garlic butter version that highlights the delicate taste of crab without overwhelming it. From preparation to serving ideas, this complete recipe will help you create a memorable seafood dinner with minimal effort. Why This Seafood Favorite Is So Popular One of the biggest reasons people love snow crab legs is their convenience. Most of them are already cooked before being frozen, which means your main task is reheating them gently while adding flavor. This makes the cooking process quick and approachable, even for those who rarely prepare seafood. Another advantage is the thin shell structure. Unlike heavier crab varieties, the shells are easier to crack, allowing the tender meat to slide out smoothly. The flavor is mild yet slightly sweet, making it perfect for pairing with garlic butter, fresh herbs, and lemon. Because of their elegant appearance, this dish often becomes the centerpiece of a special meal. Whether you’re planning a romantic dinner or a family gathering, serving beautifully prepared crab instantly elevates the table. Ingredients for Snow Crab Legs Keeping the ingredients simple allows the natural flavor of the crab to shine. Main Ingredients Garlic Butter Sauce The goal of this recipe is balance. The butter adds richness while garlic brings warmth and aroma, creating a classic flavor combination that complements seafood beautifully. Preparing Before Cooking Before cooking, make sure the snow crab legs are fully thawed. Place them in the refrigerator overnight or rinse them under cold water if you’re short on time. Thawing ensures even heating and keeps the meat tender. Some cooks like to cut a small slit along the shell using kitchen scissors. This allows the garlic butter to seep into the meat and makes eating easier later. While optional, this step can improve both flavor and presentation. Remember that most crab sold in stores is pre-cooked, so you are simply warming it rather than cooking it from raw. How to Make the Perfect Garlic Butter Garlic butter is the heart of this recipe. It enhances the seafood without overpowering its delicate taste. Cooking the garlic slowly is important. High heat can burn it quickly, which may create a bitter taste. Step-by-Step Cooking The Snow Crab Legs Garlic Butter Simmer Method This is one of the most flavorful ways to prepare snow crab legs. This method allows the sauce to coat the shells and gently infuse the meat with flavor. Steaming Method Steaming keeps the crab moist and tender while preserving its natural sweetness. Steaming is ideal if you prefer a lighter preparation with less butter. Oven-Baked Method If you are preparing a larger batch, baking is a convenient option. The foil traps steam and keeps the meat juicy while warming it evenly. Tips for Perfect Results Avoid Overheating The most common mistake when cooking seafood is leaving it on the heat too long. Since it is already cooked, a short warming time is enough. Keep the Heat Gentle Medium-low heat protects the texture and prevents the butter from separating. Serve Immediately This dish tastes best when served hot with melted butter and lemon wedges on the side. Use Quality Butter High-quality butter makes a noticeable difference in flavor and texture. How to Eat Crab Easily Eating crab may seem intimidating at first, but it becomes simple with a few techniques. Warm crab releases more easily from the shell, so serving it fresh is important. Flavor Variations You Can Try Once you master the basic method, you can customize the recipe with different flavor profiles. Lemon Herb Butter Add extra lemon zest and fresh dill for a bright, refreshing twist. Spicy Version Mix a small pinch of chili flakes into the butter for gentle heat. Smoky Grilled Style Brushing the crab with butter and grilling it briefly creates a subtle charred flavor. Honey Garlic Option A small drizzle of honey in the butter adds a sweet-savory balance that many people enjoy. Best Side Dishes to Serve The Snow Crab Legs Because the crab is rich and flavorful, simple side dishes work best. ✨ For a comforting savory side that pairs beautifully with seafood dishes, try our delicious Potato O’Brien recipe for extra flavor and texture. ✨ If you love classic homemade bread, our Hot Water Cornbread is a warm and rustic addition that completes any cozy meal. These sides complement the seafood without overpowering it. Storage and Reheating The Snow Crab Legs If you have leftovers, store them in an airtight container in the refrigerator for up to three days. To reheat, wrap them in foil and warm them in a 350°F oven for about eight minutes. Avoid microwaving whenever possible, as it can make the meat tough. ✨ And for a sweet finish after your seafood dinner, don’t miss our irresistible Powdered Sugar Donuts — light, fluffy, and perfect with coffee. Nutritional Benefits Of Snow Crab Legs This seafood option is naturally high in protein and contains essential minerals such as zinc and selenium. When paired with moderate amounts of butter and fresh lemon juice, it can be part of a balanced meal that feels indulgent yet nourishing. Frequently Asked Questions About Snow Crab Legs What is a snow crab leg?A snow crab leg comes from a cold-water crab species known for its long, slender legs and delicate, slightly sweet meat. Most snow crab legs sold in stores are already cooked and simply need to be reheated before serving. Is snow crab leg meat good?Yes, the meat is highly appreciated for its tender texture and naturally sweet flavor. It is lighter and more delicate than many other crab varieties, making it

Snow Crab Legs with Garlic Butter: A Simple and Elegant Seafood Recipe Read More »

Almond Joy Cookies

Almond Joy Cookies: A Chewy Coconut Chocolate Delight You’ll Love

If you enjoy desserts that combine coconut, chocolate, and crunchy nuts, Almond Joy Cookies are a wonderful recipe to try at home. Inspired by the famous candy bar flavors, these cookies deliver a rich, chewy texture with minimal effort. Many bakers appreciate how simple the preparation is, yet the result looks and tastes impressive enough for any occasion. Unlike traditional butter cookies, this recipe relies on coconut and condensed milk to create softness and sweetness. The balance between toasted coconut, melted chocolate chips, and almonds makes every bite satisfying without feeling heavy. Whether you are baking for a celebration or simply preparing a homemade treat, these cookies bring together comfort and indulgence. What Makes Almond Joy Cookies Special? One of the reasons Almond Joy Cookies have become popular is their simplicity. The dough doesn’t require complicated mixing techniques or long chilling times. Instead, the ingredients come together quickly, allowing even beginner bakers to achieve consistent results. Another advantage is the texture. Rather than being crumbly or dry, these cookies remain moist and chewy thanks to the coconut base. The almonds add a gentle crunch, while chocolate chips melt slightly during baking to create pockets of sweetness. Because of their macaroon-style structure, many people also enjoy making Almond Joy Cookies as a gluten-friendly dessert option. The absence of heavy flour gives them a lighter feel compared to classic cookie recipes. Ingredients Needed To Make Almond Joy Cookies To prepare a traditional batch, gather the following simple ingredients: These ingredients work together to create the signature flavor. The condensed milk binds everything while adding sweetness, which means you don’t need extra sugar or butter. Some bakers like to add vanilla extract or a pinch of salt for extra depth, but the base recipe already offers a balanced taste that highlights coconut and chocolate beautifully. Step-by-Step Instructions Prepare Your Oven Begin by preheating your oven to 325°F (160°C). Line a baking sheet with parchment paper to prevent sticking and ensure even browning. Mix the Dough In a large bowl, combine the shredded coconut, chocolate chips, almonds, and condensed milk. Stir slowly until the ingredients are evenly coated and the mixture becomes thick and sticky. Shape the Cookies Using a spoon or cookie scoop, form small mounds and place them on the prepared baking sheet. Leave a little space between each mound. You can gently press them down if you prefer flatter cookies, or leave them rounded for a classic look. Bake Until Golden Bake for about 12 to 14 minutes, watching closely as the coconut begins to turn lightly golden at the edges. The center should remain soft. Cool Before Serving Allow the cookies to cool on the baking sheet for several minutes before transferring them to a rack. They will firm up slightly as they cool. Tips for the Best Results Choose Good Chocolate High-quality chocolate chips improve the overall flavor and create a smoother melt inside the cookies. Keep an Eye on Baking Time Because coconut browns quickly, it’s important not to overbake. Remove the cookies once the edges turn golden. Shape with Damp Fingers If the mixture feels sticky, lightly dampen your hands before shaping to make handling easier. Use Sweetened Coconut Sweetened coconut helps maintain the soft texture that makes Almond Joy Cookies so enjoyable. ✨ If you enjoy bakery-style treats, you may also love our delicate almond croissant cookies — a perfect balance of crisp edges and soft centers. Delicious Variations to Try Many bakers love experimenting with small adjustments to create new flavors. Here are a few ideas you can try: Chocolate-Dipped Version After cooling, dip half of each cookie in melted chocolate for an elegant dessert look. Dark Chocolate Twist Replace semi-sweet chips with dark chocolate to create a deeper, richer taste. Almond Joy Cookie Bars Press the mixture into a lined baking pan and bake it as a single layer. Once cooled, slice into bars for easy serving. Extra Almond Crunch Sprinkle a few additional almonds on top before baking for more texture and visual appeal. ✨ For a nostalgic sweet bite, explore our powdered sugar donuts recipe, a light and fluffy dessert that pairs beautifully with coffee. Storage Tips Proper storage helps maintain freshness and texture: Because of the condensed milk, the cookies stay soft even after chilling, making them ideal for make-ahead desserts. ✨ Looking for something crisp and classic? Try our wafer cookies recipe, a simple yet elegant treat ideal for any dessert table. The Science Behind the Texture What makes Almond Joy Cookies unique is their structure. Traditional cookies rely on flour and butter to create shape, but this recipe uses condensed milk as a binding agent. During baking, the sugars caramelize gently, giving the edges a delicate crispness while the center remains tender. The coconut also plays an important role by absorbing moisture and helping the cookies hold together. This simple chemistry explains why the recipe works so well despite having only a few ingredients. Serving Ideas These cookies pair beautifully with different drinks and desserts. Serve them alongside hot coffee, cappuccino, or even a chilled coconut latte. For a more festive presentation, arrange them on a dessert platter with chocolate truffles or coconut sweets. If you are photographing them for your food blog, natural daylight and a light marble surface can highlight the golden edges and melted chocolate perfectly. Common Mistakes to Avoid Even simple recipes can benefit from a few helpful reminders: Frequently Asked Questions About Almond Joy Cookies What are Almond Joy cookies?Almond Joy cookies are chewy coconut-based cookies inspired by the classic almond, chocolate, and coconut candy flavor. They are usually made with shredded coconut, chocolate chips, almonds, and sweetened condensed milk, giving them a soft macaroon-style texture. What is Almond Joy made of?Traditional Almond Joy-style desserts combine coconut, almonds, and chocolate. In cookie form, these ingredients are mixed with condensed milk to create a rich, sweet, and chewy treat. What is the healthiest cookie you can eat?Healthier cookies often include ingredients like oats, nuts,

Almond Joy Cookies: A Chewy Coconut Chocolate Delight You’ll Love Read More »

Potato O’Brien

Potato O’Brien: The Ultimate Classic Breakfast Potato Recipe

When it comes to comforting and colorful breakfast dishes, Potato O’Brien stands out as a timeless favorite. This simple yet flavorful recipe combines diced potatoes with sweet bell peppers and onions, creating a dish that feels both rustic and vibrant. Whether served alongside eggs or enjoyed as a savory side dish, this classic preparation remains popular because it is easy to make and incredibly satisfying. In this complete guide, you’ll learn how to prepare Potato O’Brien, discover helpful cooking tips, and explore variations that keep this traditional recipe exciting and versatile. What Is Potato O’Brien? Potato O’Brien is a traditional skillet potato dish made with diced potatoes, onions, and colorful bell peppers. The ingredients are cooked until tender with lightly crispy edges, resulting in a combination of textures that makes every bite enjoyable. Unlike plain fried potatoes, this recipe includes vegetables that add sweetness and visual appeal. The peppers bring brightness, while the onions provide depth of flavor. Because of its balanced taste, Potato O’Brien works beautifully for breakfast, brunch, or even as a dinner side. Many people appreciate the simplicity of this dish. With only a few ingredients and minimal preparation, you can create a comforting recipe that feels homemade and inviting. Why This Dish Became So Popular One reason Potato O’Brien has remained popular for generations is its versatility. It can be prepared in a skillet for a crispy texture or roasted in the oven for a softer finish. The ingredients are affordable and widely available, making it an accessible option for home cooks everywhere. Another factor is its adaptability. Some families add cheese, others include herbs, and some prefer a spicy variation. Despite these changes, the basic idea of Potato O’Brien stays the same — colorful potatoes cooked with peppers and onions. This balance of simplicity and flexibility allows the recipe to fit into many different cuisines and cooking styles. Ingredients You Need Making Potato O’Brien doesn’t require complicated ingredients. Most versions rely on pantry staples that you may already have in your kitchen. Here’s a classic ingredient list: Choosing fresh vegetables makes a noticeable difference. Bright peppers and firm potatoes help give the dish its signature color and texture. Step-by-Step Guide to Making Potato O’Brien Preparing Potato O’Brien is straightforward, but following the right steps helps you achieve the perfect balance between softness and crispiness. Step 1: Prepare the Potatoes Wash and dice the potatoes into small cubes. Try to keep the pieces uniform so they cook evenly. Some cooks prefer to parboil the potatoes briefly before cooking. This helps the inside become tender while allowing the outside to crisp beautifully. Step 2: Chop the Vegetables Dice the onion and bell peppers into small pieces. The goal is to distribute them evenly throughout the dish so every bite includes a mix of flavors. Step 3: Heat the Oil Place a large skillet over medium heat and add olive oil. Allow the oil to warm before adding the potatoes. Step 4: Cook the Potatoes Add the diced potatoes and let them cook undisturbed for a few minutes. This helps create a golden crust that gives Potato O’Brien its classic texture. Step 5: Add Peppers and Onions Once the potatoes begin to soften, stir in the peppers and onions. Continue cooking until the vegetables become tender and slightly caramelized. Step 6: Season and Finish Season with salt, pepper, and paprika if desired. Stir gently and cook for another minute before serving. Oven Method for Potato O’Brien If you prefer a more hands-off approach, you can bake Potato O’Brien instead of frying it. Preheat your oven to 375°F (190°C). Spread the diced potatoes, peppers, and onions on a baking sheet. Drizzle with oil and season well. Roast for about 30–35 minutes, stirring halfway through to ensure even cooking. This method produces a slightly softer texture while still delivering delicious flavor. Tips for Perfect Texture and Flavor Cooking Potato O’Brien successfully comes down to a few simple techniques. Use the Right Heat Medium heat allows the potatoes to cook through without burning the vegetables. Avoid Overcrowding Too many ingredients in one pan can trap moisture and prevent crispiness. Dry the Potatoes If you rinse them, pat them dry before cooking to help achieve a golden surface. Season Gradually Adding seasoning at different stages helps build flavor without overwhelming the dish. Creative Variations to Try One of the best things about Potato O’Brien is how easily you can customize it. Cheesy Version Sprinkle shredded cheese over the potatoes just before serving for a creamy finish. Spicy Style Add chili flakes or smoked paprika for extra warmth. Herb-Infused Fresh parsley, thyme, or rosemary can add brightness and aroma. Protein Addition Diced chicken or turkey sausage can transform Potato O’Brien into a complete meal. These variations allow you to enjoy the classic recipe while adding your personal touch. Serving Ideas Potato O’Brien pairs beautifully with many dishes. Here are some serving suggestions: Because the flavors are mild yet savory, this dish complements both hearty and light meals. Looking for another classic comfort dish? Our tender beef neck bones recipe is a delicious option worth trying. Is Potato O’Brien Healthy? While potatoes are often seen as comfort food, they also provide important nutrients like potassium and fiber. The addition of peppers and onions brings vitamins and antioxidants, making Potato O’Brien more balanced than plain fried potatoes. To create a lighter version, consider baking the ingredients instead of frying them. Using olive oil and adding extra vegetables can also make the dish feel more nutritious while still maintaining its classic flavor. For an easy slow-cooked meal packed with smoky flavor, don’t miss our crockpot BBQ chicken that pairs beautifully with savory sides. Storage and Reheating Tips If you have leftovers, Potato O’Brien stores well and can be enjoyed later. Avoid reheating for too long in the microwave, as it may soften the potatoes. If you enjoy rich, comforting flavors, you might also love our hearty carne con chile recipe — a perfect dish to

Potato O’Brien: The Ultimate Classic Breakfast Potato Recipe Read More »

Beef Neck Bones

Beef Neck Bones Recipe: Tender Slow-Braised Comfort Food You’ll Love

If you enjoy rich, comforting meals with deep flavor, beef neck bones are a hidden treasure in the kitchen. This affordable cut transforms into a tender and satisfying dish when cooked slowly, making it perfect for cozy dinners and traditional home cooking. With simple ingredients and the right technique, you can turn beef neck bones into a meal that tastes both rustic and elegant. This recipe focuses on slow braising, a classic method that allows the meat to soften gradually while absorbing herbs and aromatics. The result is juicy meat that falls easily from the bone and a savory sauce that pairs beautifully with rice, mashed potatoes, or crusty bread. What Are Beef Neck Bones? Beef neck bones come from the neck area of the cow, where muscles work constantly. Because of this, the cut contains connective tissue and collagen that require slow cooking to become tender. When braised properly, the collagen melts into gelatin, creating a rich texture and deep flavor. Many cooks appreciate beef neck bones not only for their taste but also for their versatility. They can be prepared in a variety of styles, from classic braises to hearty stews. Despite their humble appearance, they deliver an impressive culinary experience when handled with patience and care. Why Slow Cooking Makes a Difference Cooking beef neck bones quickly can leave the meat tough, but slow braising transforms them completely. The gentle heat breaks down fibers over time, allowing the meat to become soft while maintaining moisture. Another advantage of slow cooking is the development of flavor. As the dish simmers, the ingredients blend together, creating a sauce that feels rich and comforting without requiring complicated steps. This makes beef neck bones an ideal choice for cooks who want maximum flavor with minimal effort. Ingredients for Classic Beef Neck Bones To create a traditional braised dish, gather the following ingredients: These ingredients highlight the natural richness of beef neck bones while building a balanced and aromatic sauce. Step-by-Step Cooking Instructions 1. Season the Meat Start by drying the beef neck bones with paper towels. Season generously with salt and pepper to enhance the flavor from the beginning. 2. Brown the Beef Neck Bones Heat oil in a heavy pot over medium-high heat. Add the beef neck bones in batches and sear each side until golden brown. This step creates a flavorful crust that strengthens the overall taste of the dish. Once browned, remove the beef neck bones and set them aside. 3. Cook the Aromatics In the same pot, add onions and cook until soft. Stir in garlic and tomato paste, letting the paste cook briefly to deepen its flavor. Deglaze with red wine if using, scraping the bottom of the pot to release the caramelized bits. 4. Add Liquid and Herbs Pour in the beef broth and add thyme and bay leaf. Return the beef neck bones to the pot, arranging them so they sit partially in the liquid. The braising process works best when the meat is not fully submerged. 5. Slow Braise Until Tender Cover the pot tightly and cook the beef neck bones at a low temperature. In the oven, bake at about 300°F (150°C) for roughly three hours, or simmer gently on the stovetop until fork-tender. During this time, the connective tissue softens and the sauce thickens naturally, giving the dish its signature richness. 6. Finish and Serve Taste the sauce and adjust seasoning if needed. If you prefer a thicker gravy, simmer uncovered for a few minutes before serving the beef neck bones hot. Flavor Variations for Beef Neck Bones One of the best things about cooking beef neck bones is how easily you can adapt the flavor profile. Southern Comfort Style Add smoked paprika and a pinch of chili powder to create a warm and comforting version that pairs well with greens and cornbread. Herb-Forward Version Use fresh rosemary and mushrooms for an earthy twist that feels elegant yet simple. Savory Fusion Approach Incorporate soy sauce and ginger for a slightly different flavor direction that still highlights the richness of beef neck bones. These variations allow you to customize the recipe while keeping the cooking process straightforward. • If you enjoy bold and comforting flavors, you might also love our Carne Con Chile recipe, a rich and satisfying dish perfect for hearty meals. Expert Tips for Perfect Results Sear Before BraisingAlways brown the beef neck bones first. This step adds depth and improves the final texture. Use Gentle HeatLow temperatures help break down collagen slowly, ensuring the meat becomes tender instead of dry. Choose the Right PotA heavy Dutch oven helps distribute heat evenly and prevents burning during long cooking times. Let the Dish RestAllow the beef neck bones to sit for a few minutes before serving so the juices redistribute. • Looking for an easy slow-cooker idea? Don’t miss our Crockpot BBQ Chicken, a simple recipe packed with smoky flavor and tender texture. Nutritional Highlights While beeef neck bones are known for their rich flavor, they also provide protein and natural collagen from slow cooking. The broth created during braising becomes silky and satisfying, making the dish feel hearty without needing heavy sauces. Pairing beef neck bones with vegetables or whole grains can help create a balanced and nourishing meal that feels both comforting and wholesome. • For a creative fusion twist, try our Birria Ramen, where deep savory broth meets comforting noodles in an irresistible bowl. Serving Suggestions There are many delicious ways to enjoy beef neck bones: Leftover beef neck bones can even be shredded and used in sandwiches or soups, giving you multiple meals from one recipe. Storage and Reheating One of the best things about cooking beef neck bones is that they store well and often taste even better the next day. Avoid reheating at high temperatures, as this can make the meat less tender. Frequently Asked Questions Can I cook beef neck bones in a slow cooker? Yes. After browning, transfer the beef neck bones

Beef Neck Bones Recipe: Tender Slow-Braised Comfort Food You’ll Love Read More »

Crockpot BBQ Chicken

Crockpot BBQ Chicken: The Easy Slow Cooker Recipe Everyone Loves

If you want a meal that is comforting, simple, and full of bold flavor, crockpot bbq chicken is a perfect choice. This slow cooker recipe transforms everyday ingredients into juicy, tender shredded chicken coated in rich barbecue sauce. With very little preparation, you can create a dish that feels homemade and satisfying while saving time in the kitchen. Many home cooks appreciate crockpot bbq chicken because it combines convenience with versatility. The slow cooker allows the sauce to slowly infuse into the chicken, creating deep flavor without constant attention. Whether served in sandwiches, bowls, or wraps, this recipe adapts easily to different meals and occasions. Why Crockpot BBQ Chicken Works So Well The success of crockpot bbq chicken comes from the gentle cooking process. Slow heat breaks down the fibers of the meat, allowing it to stay moist and tender while absorbing the flavors of the sauce. Unlike quick cooking methods, slow cooking creates a texture that shreds easily and tastes rich in every bite. Another reason crockpot bbq chicken is so popular is its flexibility. You can prepare it in advance, store leftovers, or even freeze portions for later meals. Because the recipe requires only a few ingredients, it’s an ideal option for busy schedules or beginner cooks who want reliable results. Ingredients for Crockpot BBQ Chicken One of the biggest advantages of crockpot bbq chicken is its simplicity. Most of the ingredients are already available in a typical kitchen. Main Ingredients These ingredients combine to create a balanced sauce that enhances the natural flavor of the chicken. The sweetness of the sugar pairs with the tangy barbecue sauce, while the onion adds depth. Optional Additions Adding spices allows you to personalize crockpot bbq chicken depending on your taste preferences. How to Make Crockpot BBQ Chicken Step by Step Preparing crockpot bbq chicken requires only a few minutes of active work, making it ideal for busy days. 1. Prepare the Sauce In your slow cooker, mix barbecue sauce, chopped onion, olive oil, Worcestershire sauce, and brown sugar until smooth. 2. Add the Chicken Place the chicken pieces into the sauce and turn them gently to coat all sides. This helps the flavors distribute evenly during cooking. 3. Cook Slowly Cover the slow cooker and cook on low heat for six to seven hours, or on high heat for about three hours. The slow cooking process is what gives crockpot bbq chicken its signature tender texture. 4. Shred the Chicken Once cooked, remove the chicken and shred it using two forks. Return it to the crockpot and mix it into the sauce for maximum flavor. Tips for Perfect Crockpot BBQ Chicken Even though crockpot bbq chicken is easy, a few simple tips can make the recipe even better. Choose the Right Cut: Chicken thighs create richer flavor, while breasts keep the dish lighter.Avoid Extra Liquid: The chicken releases juices as it cooks, so extra broth isn’t necessary.Cook on Low When Possible: Lower heat helps maintain moisture and improves flavor development.Adjust the Sauce: After shredding, taste and add more barbecue sauce if needed. ✨ For a creamy and flavorful appetizer to serve alongside this dish, try our delicious cottage cheese spinach artichoke dip for a lighter twist on a classic favorite. Serving Ideas for Crockpot BBQ Chicken One reason crockpot bbq chicken is loved by so many people is how versatile it is. Sandwiches Serve the shredded chicken on toasted buns with coleslaw or pickles for a classic comfort meal. Rice or Grain Bowls Pair crockpot bbq chicken with steamed rice, quinoa, or couscous for a balanced and filling dish. Wraps and Tacos Use tortillas to create wraps topped with avocado or fresh herbs. Salads Add warm shredded chicken to a green salad for a lighter option that still feels satisfying. ✨ If you’re looking for a healthier way to enjoy your shredded chicken, pair it with our soft and flexible low-carb wraps for an easy and satisfying meal idea. Flavor Variations You can easily adapt crockpot bbq chicken by changing a few ingredients. Sweet Honey Style: Add honey or maple syrup for extra sweetness.Spicy Version: Mix in hot sauce or cayenne pepper.Smoky Flavor: Use smoked paprika or chipotle powder.Garlic Lovers: Increase garlic powder or add minced garlic. These variations keep the recipe exciting while maintaining the familiar base of crockpot bbq chicken. Common Mistakes to Avoid Even simple recipes benefit from a few reminders. Avoiding these mistakes helps ensure that crockpot bbq chicken turns out tender and flavorful every time. ✨ Want another high-protein comfort recipe? Don’t miss our protein pizza, a balanced and tasty option perfect for busy weeknight dinners. Storage and Meal Prep Tips Another advantage of crockpot bbq chicken is how well it stores. Refrigerator: Keep leftovers in an airtight container for up to four days.Freezer: Freeze portions for up to three months.Reheating: Warm gently with extra sauce to keep the chicken moist. Preparing crockpot bbq chicken ahead of time makes weekday meals faster and more convenient. Nutrition and Balanced Eating Crockpot bbq chicken can fit into many balanced meal plans depending on how it’s served. Chicken provides a good source of protein, while pairing it with vegetables or whole grains helps create a more complete meal. Choosing a barbecue sauce with less sugar is a simple way to make the dish lighter without sacrificing flavor. Why Crockpot BBQ Chicken Is a Family Favorite Families often love crockpot bbq chicken because it’s comforting, easy to prepare, and adaptable to different tastes. The slow cooker method allows you to focus on other tasks while dinner cooks quietly in the background. When the chicken is finally shredded and mixed with the sauce, the result is tender, flavorful, and perfect for sharing. Final Thoughts Once you try crockpot bbq chicken, it quickly becomes a reliable recipe you’ll want to make again. The combination of simple ingredients, slow cooking, and rich barbecue flavor creates a dish that feels special without requiring complicated techniques. Whether served in sandwiches, bowls, or salads,

Crockpot BBQ Chicken: The Easy Slow Cooker Recipe Everyone Loves Read More »

Hot Water Cornbread

Hot Water Cornbread: A Crispy Southern Classic That Never Goes Out of Style

Southern cooking is filled with comforting traditions, and Hot Water Cornbread stands out as one of the simplest yet most satisfying recipes ever created. With its golden crust, rustic texture, and rich corn flavor, this dish has remained a staple on family tables for generations. Unlike fluffy baked cornbread, this version is shaped into small patties and fried until perfectly crisp, giving it a unique character that many people find irresistible. The beauty of Hot Water Cornbread lies in its simplicity. Using only a few pantry ingredients, you can create a side dish that pairs effortlessly with hearty meals like beans, greens, soups, or roasted meats. Even beginners in the kitchen can master this recipe quickly, making it a timeless favorite for both experienced cooks and those just learning traditional Southern techniques. The Story Behind This Classic Dish For many families, Hot Water Cornbread represents more than just food — it carries memories of home cooking and shared meals. Historically, this recipe became popular because it required very few ingredients. Cornmeal was affordable and easy to store, and hot water allowed cooks to prepare bread without needing an oven. Over time, the recipe evolved into a symbol of resourcefulness and comfort. Its crispy exterior and soft interior offered a satisfying contrast that complemented simple dishes. Today, many people continue to prepare Hot Water Cornbread not only for its flavor but also for the sense of tradition it brings to the table. Why You’ll Love This Recipe There are countless reasons why cooks continue to return to Hot Water Cornbread again and again: Because this recipe cooks in minutes, it’s perfect when you need a warm side dish without spending hours in the kitchen. Ingredients You’ll Need A traditional batch of Hot Water Cornbread requires only a handful of simple ingredients. Main Ingredients Some cooks prefer adding a little extra seasoning, but the classic version keeps the flavors straightforward and authentic. Step-by-Step Instructions Preparing Hot Water Cornbread at home is easy once you understand the basic technique. Follow these steps carefully for the best results. 1. Combine the Dry Ingredients In a mixing bowl, stir together the cornmeal, salt, and sugar if using. Make sure everything is evenly blended before adding liquid. 2. Pour in the Boiling Water Slowly add boiling water while stirring continuously. The heat softens the cornmeal and helps create the signature texture. The mixture should form a thick, scoopable dough rather than a thin batter. 3. Allow the Mixture to Rest Let the dough sit for about five minutes. This resting period helps the cornmeal absorb moisture fully, ensuring your patties hold their shape during frying. 4. Shape the Patties Using a spoon or lightly oiled hands, form small oval or round portions. Traditional Hot Water Cornbread is often shaped into rustic patties about half an inch thick. 5. Heat the Oil Pour a shallow layer of oil into a heavy skillet and heat over medium-high heat. Properly heated oil is essential for achieving the crispy exterior that makes this dish so special. 6. Fry Until Golden Brown Place the patties gently into the skillet. Fry each side for about two minutes or until deep golden in color. Avoid overcrowding the pan so each piece cooks evenly. 7. Drain and Serve Remove the patties and place them on paper towels to absorb excess oil. Serve warm to enjoy the full flavor and crunch of freshly cooked Hot Water Cornbread. What Makes This Recipe Unique? Unlike traditional baked cornbread, Hot Water Cornbread is known for its fried texture and rustic appearance. The boiling water partially cooks the cornmeal before frying, giving the patties a soft yet structured interior. This method produces a rich corn flavor that feels both hearty and nostalgic. Because the recipe doesn’t rely on eggs or milk, it maintains a simple, old-fashioned character. Many people appreciate how easy it is to prepare while still delivering bold flavor. ✨ If you enjoy light and airy desserts, don’t miss our cloud cake recipe — a soft, delicate treat that melts beautifully with every bite. Tips for Perfect Results Even though Hot Water Cornbread is simple to make, a few small techniques can help you achieve the best texture. These small adjustments can make a noticeable difference in the final result. 🥑 Looking for a healthier bread alternative? Our avocado bread is a nourishing option packed with flavor and perfect for everyday meals. Flavor Variations While the classic recipe is beloved for its simplicity, you can customize Hot Water Cornbread in several ways: Experimenting with flavors allows you to create a version that suits your personal taste while still honoring tradition 🌿 For a balanced and satisfying low-carb idea, try our low-carb wraps — simple, versatile, and ideal for quick lunches. Serving Ideas One of the reasons Hot Water Cornbread remains so popular is its versatility. It pairs well with many comforting dishes, including: Its sturdy texture makes it perfect for dipping into sauces or soaking up flavorful broths. Storage and Reheating Although Hot Water Cornbread tastes best fresh from the skillet, leftovers can still be enjoyed later with proper storage. Avoid microwaving if possible, as it softens the crust and reduces the signature crunch. Frequently Asked Questions Can I bake instead of fry? Traditional Hot Water Cornbread is fried, which gives it its classic texture. Baking will produce a different result that resembles standard cornbread more than the original recipe. Is sugar required? No. Some people prefer a savory flavor without sweetness, while others enjoy a slightly sweet touch. Both styles are authentic. Which cornmeal works best? Medium-ground yellow cornmeal is most commonly used, but white cornmeal can also create a delicious variation. Final Thoughts Few recipes capture the essence of comfort cooking quite like Hot Water Cornbread. Its crispy edges, tender center, and rich corn flavor make it a timeless side dish that continues to bring people together around the table. With only a handful of ingredients and a simple cooking method, this recipe proves

Hot Water Cornbread: A Crispy Southern Classic That Never Goes Out of Style Read More »

cloud cake

Cloud Cake Recipe – 6 Easy Steps to Make the Ultimate Soft & Fluffy Dessert

Few desserts capture elegance and simplicity quite like a classic cloud cake. With its delicate crumb and airy texture, this light sponge-style creation has become a favorite among home bakers who want something refined without complicated techniques. The beauty of this recipe lies in its balance — soft yet structured, simple yet impressive. Unlike heavy butter cakes, this airy dessert relies on whipped eggs and gentle folding methods to achieve its signature lightness. The result is a dessert that feels almost weightless on the palate, making it perfect for afternoon coffee, brunch gatherings, or elegant celebrations. In this guide, you will learn how to prepare a perfectly fluffy cake from scratch, along with professional tips that help maintain its soft structure and smooth finish. What Makes This Cloud Cake So Light? The secret behind this airy dessert comes from its preparation technique rather than complicated ingredients. Egg whites are whipped to create tiny air pockets that expand during baking, giving the finished cake its height and softness. Instead of relying on heavy fats, the recipe focuses on structure created through careful mixing. Many bakers describe this style as somewhere between a sponge cake and a soufflé. Yogurt or starch is often added to maintain moisture, ensuring the crumb stays tender without becoming dense. Because the texture is delicate, every step — from whipping the eggs to folding the batter — plays an important role in achieving the desired result. Ingredients You’ll Need To Make Cloud Cake One of the most appealing aspects of this Cloud Cake recipe is its simplicity. Most ingredients are already in a typical kitchen pantry. Each ingredient has a purpose. Yogurt adds softness, cornstarch provides stability, and whipped egg whites bring volume. Step-by-Step Instructions 1. Prepare the Pan and Ingredients Preheat your oven to 170°C (340°F). Line the bottom of a round baking pan with parchment paper. Separate the eggs carefully, placing whites and yolks in different bowls. 2. Create the Base Mixture Whisk egg yolks with sugar until the mixture becomes pale and creamy. This step helps dissolve the sugar and gives the batter a smooth foundation. Add yogurt, cornstarch, and baking powder, mixing gently until well combined. 3. Whip the Egg Whites Add a small pinch of salt to the egg whites and beat until stiff peaks form. The foam should look glossy and stable, as this structure helps the cake rise naturally in the oven. 4. Fold Gently Start by adding a small portion of whipped whites to the yolk mixture to lighten it. Then incorporate the remaining whites slowly using upward folding motions. Avoid stirring too quickly, as this can deflate the batter. 5. Bake Transfer the batter into the prepared pan and smooth the surface lightly. Bake for about 45 to 55 minutes until the top is lightly golden and the center feels set. 6. Cool and Serve Allow the cake to cool gradually before removing it from the pan. Finish with a generous dusting of powdered sugar for a simple and elegant presentation. ✨ If you enjoy delicate bakery flavors, you may also love our almond croissant cookies — a refined treat with a buttery, irresistible texture. The Science Behind the Texture The light crumb of this Cloud Cake dessert comes from a process known as aeration. When egg whites are whipped, proteins stretch and trap air, creating a foam that expands with heat. As the cake bakes, these air pockets stabilize and give structure to the crumb. Cornstarch works alongside the eggs to keep the interior soft without adding heaviness. Yogurt provides moisture and a subtle tang that balances sweetness. Because this method depends on air rather than fat, precision and patience are key. ✨ For a soft and nutty twist, explore our pistachio muffins, perfect for pairing with your favorite coffee or tea. Helpful Tips for Beginners Even though the recipe looks simple, small details can make a big difference in the final result: These techniques help maintain the airy texture that makes this dessert so unique. ✨ And if you’re craving something comforting yet elegant, don’t miss our pistachio loaf, known for its rich aroma and tender crumb. Flavor Ideas and Variations Once you master the base of Cloud Cake recipe, you can customize the flavor in many creative ways: Lemon VersionAdd lemon zest to the batter for a fresh citrus note. Vanilla StyleA teaspoon of vanilla extract enhances aroma and warmth. Berry PairingServe slices with strawberries, raspberries, or blueberries for a colorful finish. Coconut TwistTop with whipped coconut cream for a tropical touch. These variations allow you to adapt the recipe while preserving its light character. Serving Suggestions Cloud Cake Because the texture is delicate, simple garnishes often work best. Consider serving your slices with: Avoid heavy frostings that could weigh down the cake’s soft structure. Common Baking Mistakes to Avoid Collapsed CenterOpening the oven too early can cause the cake to sink. Let it bake undisturbed for most of the cooking time. Dense TextureOvermixing during folding removes the air needed for a fluffy crumb. Cracked SurfaceA few cracks are normal, but excessive cracking may indicate that the oven temperature is too high. Recognizing these issues helps you adjust your technique for better results next time. Storage Tips This Cloud Cake dessert tastes best on the day it is baked, but you can store leftovers easily. Bring chilled slices back to room temperature before serving so the texture becomes soft again. Why This Cloud Cake Recipe Works So Well The combination of yogurt, cornstarch, and whipped eggs creates a balanced structure that feels light yet stable. The flavor remains subtle, allowing you to enjoy the softness without overwhelming sweetness. Many bakers appreciate this style because it proves that impressive desserts do not require complicated decoration. With a few thoughtful techniques, you can create something that looks elegant and tastes delicate. Final Thoughts About Cloud Cake A well-made cloud cake is all about precision and care. By focusing on gentle folding, proper whipping, and steady baking

Cloud Cake Recipe – 6 Easy Steps to Make the Ultimate Soft & Fluffy Dessert Read More »

Avocado Bread

Avocado Bread: The Ultimate Soft, Healthy, and Easy Homemade Recipe

If you love baking simple yet nourishing recipes, avocado bread is a delicious trend worth trying. This soft and flavorful loaf uses ripe avocado to create a moist texture without relying on large amounts of butter or oil. The result is a balanced recipe that feels comforting while still modern and light. Many home bakers are turning to avocado bread because it combines minimal ingredients with impressive results. Whether served for breakfast, lunch, or a quick snack, this versatile loaf adapts easily to different flavors. Once you learn how to prepare avocado bread at home, you’ll discover just how simple and satisfying it can be. What Is Avocado Bread? Avocado bread is a soft baked recipe made by incorporating mashed avocado into a dough or batter. The avocado provides natural richness, helping the bread stay tender and moist. Unlike traditional recipes that depend heavily on butter, avocado bread uses the creamy texture of fresh avocado as a key ingredient. Some versions of avocado bread are savory and protein-rich, while others are slightly sweet and similar to classic quick breads. Regardless of the variation, the goal remains the same: creating a soft loaf with a unique texture and subtle flavor. Because avocadoo bread can be prepared quickly, it has become popular among people looking for healthier homemade alternatives. The recipe works well for beginners since it doesn’t require complicated techniques or long rising times. Ingredients Needed for Avocado Bread The beauty of avocado bread lies in its simplicity. A basic recipe requires only a few ingredients that come together to create a surprisingly flavorful result. Main Ingredients These three elements form the foundation of a simple avocado bread. The avocado adds moisture, the egg helps bind everything together, and the cheese provides structure during baking. Optional Seasonings Adding seasoning allows you to personalize the taste of your avocado bread without changing the overall texture. How to Make Avocado Bread Step by Step Step 1: Mash the Avocado Start by cutting a ripe avocado in half and removing the pit. Scoop the flesh into a bowl and mash it thoroughly until smooth. A creamy consistency ensures the avocado bread will bake evenly. Step 2: Mix the Ingredients Add the egg and shredded cheese to the mashed avocado. Stir gently until the mixture becomes thick and uniform. Avoid overmixing, as this can make the avocado bread dense. Step 3: Shape the Portions Line a baking tray with parchment paper. Spoon the mixture onto the tray and flatten it slightly to form small rounds. Thin shapes help the avocado bread cook faster and develop a golden edge. Step 4: Bake Preheat your oven to 200°C. Bake the portions for about 20 minutes, or until the tops become lightly golden and firm to the touch. Step 5: Cool and Enjoy Allow the avocado bread to cool for a few minutes before serving. Cooling helps the structure set, making each piece easier to handle. Looking for another high-protein comfort recipe? Try our protein pizza for a satisfying and balanced homemade option. Why Avocado Bread Has Such a Moist Texture One of the main reasons avocado bread feels so soft is the natural fat content of avocado. These fats help lock in moisture while giving the bread a tender crumb. Eggs provide stability, while cheese adds a slightly chewy consistency that balances the softness. Unlike traditional baking methods that rely on large amounts of oil, avocado bread achieves its richness naturally. This combination creates a texture that is both light and satisfying. If you love easy low-carb baking, don’t miss our soft and flexible low-carb wraps, ideal for quick healthy meals. Tips for Perfect Avocado Bread Every Time Choose a Perfectly Ripe Avocado The success of avocadoo bread depends heavily on the quality of the avocado. It should feel slightly soft but not overly mushy. Keep the Mixture Balanced Too much avocado can make the bread overly soft, while too little may reduce moisture. Maintaining the right ratio ensures the avocadoo bread holds together well. Use Parchment Paper Since avocado bread contains natural oils, parchment paper prevents sticking and makes cleanup easier. Bake at the Right Temperature A hot oven helps create a golden exterior while keeping the inside soft and tender. For a creamy, flavorful pairing idea, you might also enjoy our cottage cheese spinach artichoke dip — a perfect match for savory recipes. Sweet vs. Savory Avocado Bread Variations One of the best features of avocadoo bread is how adaptable it is. You can easily transform the recipe depending on your taste preferences. Sweet Avocado Bread To create a sweeter version, add a small amount of sugar, vanilla extract, or chocolate chips. This style of avocadoo bread works well for breakfast or dessert and pairs beautifully with coffee. Savory Avocado Bread The savory version focuses on herbs, cheese, and spices. Many people enjoy avocadoo bread as a base for sandwiches or topped with eggs and vegetables. Adding seeds or grated parmesan can enhance both flavor and texture. Experimenting with different ingredients allows you to create a unique avocadoo bread every time you bake. Health Benefits of Avocado Bread Avocadoo bread is often chosen by those who want a more nourishing baked option. Avocados contain natural fats that help create a satisfying texture, while eggs add protein and structure. Because many avocadoo bread recipes use simple ingredients, they can feel lighter than traditional bread. The combination of healthy fats and protein helps make avocadoo bread filling, making it a practical choice for busy mornings or quick meals. Serving Ideas for Avocado Bread There are many creative ways to enjoy avocadoo bread once it’s baked: Because avocadoo bread has a mild flavor, it pairs easily with both fresh and savory toppings. Storage and Reheating Tips If you have leftover avocadoo bread, proper storage helps maintain its texture. Place cooled pieces in an airtight container and refrigerate for up to four days. Reheat gently in the oven or toaster to restore the crisp edges. For longer storage,

Avocado Bread: The Ultimate Soft, Healthy, and Easy Homemade Recipe Read More »

protein pizza

Protein Pizza Recipe: 7 Powerful Secrets for the Best High-Protein Chicken Crust

If you love pizza but want something lighter and more nourishing, this protein pizza recipe offers a delicious alternative. Instead of using a traditional flour dough, this version features a savory chicken-based crust that delivers flavor, structure, and impressive protein content. A well-made protein pizza keeps the comforting essence of classic pizza while supporting balanced eating habits and modern nutrition goals. Many home cooks are turning toward creative high-protein meals that feel satisfying without being heavy. A protein pizza achieves that balance by combining simple ingredients with smart cooking techniques. The result is a crispy, cheesy dish that feels indulgent while still aligning with a more mindful lifestyle. Why Protein Pizza Is Becoming a Favorite Choice The popularity of protein pizza continues to grow because it blends convenience with nutritional benefits. Unlike traditional dough recipes that require time for rising and shaping, this crust comes together quickly using ground chicken, egg, cheese, and seasoning. This streamlined preparation makes protein pizza an appealing option for busy weeknights or quick meal prep. Another reason people love protein pizza is its versatility. You can adjust flavors, toppings, and seasonings to suit your preferences. Some prefer a classic tomato and mozzarella combination, while others enjoy bold spices, fresh herbs, or roasted vegetables. Regardless of how you customize it, the core idea of protein pizza remains the same: a satisfying dish that prioritizes protein without sacrificing taste. Ingredients for a Flavorful Protein Pizza Chicken Crust Base The combination of egg and cheese helps the chicken form a cohesive crust, while the seasoning creates a familiar pizza aroma. Toppings Choosing balanced toppings helps maintain the structure of your protein pizza while enhancing flavor. Step-by-Step Instructions for Protein Pizza Prepare the Chicken Mixture In a large bowl, combine ground chicken, egg, Parmesan cheese, mozzarella, and seasonings. Mix until fully combined. The texture should be smooth and slightly sticky, allowing you to spread it easily onto parchment paper. Shape the Crust Line a baking sheet with parchment paper. Spread the mixture into a thin round or rectangle, about a quarter-inch thick. Keeping the crust thin ensures that the protein pizza cooks evenly and develops a firm texture. Pre-Bake the Crust Preheat the oven to 400–425°F (200–220°C). Bake the crust alone for about 20 minutes until it becomes lightly golden and firm. Pre-baking is essential for any protein pizza because it prevents the base from becoming soggy once toppings are added. Allow the crust to rest briefly before moving to the next step. Add Sauce and Toppings Spread a thin layer of pizza sauce across the surface. Add mozzarella and your chosen toppings evenly. Avoid overloading the pizza, as excess moisture can soften the crust. Final Bake Return the protein pizza to the oven and bake for another 8–12 minutes until the cheese melts and bubbles. For extra color, broil briefly at the end while watching closely. For a bold and flavorful appetizer, don’t miss our cottage cheese buffalo chicken dip, packed with protein and rich savory taste. Tips to Make the Best Protein Pizza Every Time Use ground chicken with moderate fat content.This helps keep the crust moist and flavorful. Press the mixture evenly.Uniform thickness prevents uneven cooking. Bake long enough during the first stage.A properly cooked base ensures that your protein pizza slices cleanly. Keep toppings light.Too much sauce or cheese may weigh down the crust. Rest before slicing.Allowing the pizza to cool slightly helps it firm up. Looking for another low-carb idea to pair with your meal? Try our soft and flexible low carb wraps for a simple, satisfying option. Nutritional Benefits of Protein Pizza One of the biggest advantages of protein pizza is its nutritional profile. Because the crust relies on chicken instead of refined flour, each slice delivers more protein while reducing carbohydrates. This balance makes protein pizza a popular option for people who want meals that feel filling yet lighter. Protein-rich dishes can help maintain energy levels and support satiety. Adding vegetables as toppings increases fiber and micronutrients, transforming a simple pizza into a more complete meal. For many households, protein pizza has become a practical way to enjoy comfort food while staying mindful of nutrition. If you enjoy high-protein comfort foods, you may also love our creamy cottage cheese spinach artichoke dip — a lighter twist on a classic favorite. Creative Protein Pizza Variations Once you master the basic method, you can explore endless variations of protein pizza: Mediterranean Style Add olives, cherry tomatoes, and feta cheese for a fresh and savory twist. Spicy BBQ Version Use barbecue sauce and top with red onions and jalapeños for bold flavor. Veggie Lover’s Pizza Roasted zucchini, spinach, and mushrooms create a colorful and nutrient-rich option. White Garlic Protein Pizza Replace tomato sauce with a garlic yogurt or ricotta base and finish with herbs. Each variation keeps the same protein-rich crust while offering a new flavor experience. Common Mistakes to Avoid Even though protein pizza is simple to prepare, a few common errors can affect the final result: By avoiding these mistakes, your protein pizza will maintain the perfect balance between crispness and tenderness. Serving Suggestions for Protein Pizza Protein pizza is incredibly versatile when it comes to serving. Pair it with a fresh green salad or roasted vegetables for a balanced meal. It also works well as a high-protein lunch option or as part of a casual gathering with friends. Some people like cutting protein pizza into small squares and serving it as an appetizer. The golden edges and melted cheese create a presentation that looks just as appealing as traditional pizza. Storage and Reheating Tips Store leftover slices in an airtight container in the refrigerator for up to three days. Reheat in an oven or air fryer to maintain the crisp texture. You can also freeze a pre-baked crust without toppings and finish baking it later for a quick meal. Frequently Asked Questions Which pizza has the most protein?A protein pizza made with a chicken or high-protein crust usually contains the most

Protein Pizza Recipe: 7 Powerful Secrets for the Best High-Protein Chicken Crust Read More »

Horse Salt Trick

Horse Salt Trick: The Viral Kitchen Method Explained With Origins, Uses, and Practical Tips

The Horse Salt Trick has become a fascinating topic across modern food culture and online discussions. Although the name sounds unusual, the idea behind the Horse Salt Trick is surprisingly simple: using salt strategically to enhance flavor, improve texture, and create a more balanced culinary experience. Many people encounter the Horse Salt Trick through viral trends, yet its roots are connected to traditional practices that have existed for generations. In this guide, we explore the background of the Horse Salt Trick, why it gained popularity, and how it can be applied responsibly in everyday cooking. Understanding the story behind the Horse Salt Trick allows you to appreciate it as more than just a trend — it becomes a technique grounded in observation and simplicity. What Is the Horse Salt ? The Horse Salt refers to a seasoning approach inspired by traditional farm methods where salt was used carefully to influence hydration and appetite. In modern kitchens, the Horse Salt Trick describes adding a small amount of salt at the right moment to enhance natural flavors rather than overpower them. Unlike complicated culinary techniques, the Horse Salt Trick focuses on timing and balance. Many cooks interpret it as a reminder that a single ingredient, when used correctly, can transform an entire dish. The popularity of the Horse Salt Trick comes from this minimalist philosophy, which fits perfectly with current trends toward simple and authentic cooking. The Origins Behind the Horse Salt Trick Historically, salt played a vital role in farming communities. Caretakers often used mineral salts to maintain animal health, which eventually inspired creative interpretations in food culture. The phrase Horse Salt emerged as a way to describe these traditional ideas in a memorable and engaging way. Over time, writers and chefs adopted the term to describe bold seasoning strategies. Instead of viewing salt as just a basic ingredient, the Horse Salt Trick reframes it as a powerful culinary tool. The story behind the Horse Salt Trick adds a sense of authenticity that appeals to audiences searching for rustic inspiration. Why the Horse Salt Trick Became a Trend The rise of the Horse Salt Trick can be linked to several modern influences. First, people are increasingly interested in techniques that feel natural and accessible. Second, social media platforms often highlight unusual names or unexpected ideas, making the Horse Salt Trick stand out among other cooking trends. Another reason for its popularity is curiosity. The phrase itself invites questions, encouraging readers to explore what makes the Horse Salt Trick different from ordinary seasoning methods. As a result, the concept spread quickly among food bloggers and home cooks looking for fresh inspiration. How the Horse Salt Trick Enhances Flavor Salt is essential in cooking because it amplifies taste without adding complexity. The Horse Salt focuses on using salt at precise stages of preparation to achieve the best results. Strategic Timing Instead of adding salt all at once, many cooks who follow the Horse Salt Trick recommend seasoning in layers. For example: This layered approach allows the Horse Salt Trick to enhance both texture and aroma. Balancing Sweet and Savory One of the most interesting aspects of the Horse Salt Trick is its ability to balance sweetness. Even desserts can benefit from a tiny amount of salt, which intensifies flavor and prevents recipes from tasting overly sugary. “And if you want to discover a more traditional mineral approach, don’t miss our Celtic salt technique explained step by step.” The Horse Salt Trick in Modern Recipes Today, the Horse Salt appears in a variety of culinary styles. Some cooks use it when preparing roasted vegetables, while others incorporate it into refreshing drinks or baked goods. The versatility of the Horse Salt Trick makes it appealing for both beginners and experienced chefs. Popular interpretations include: Each variation shows how the Horse Salt Trick adapts easily to different cuisines and preferences. “For another simple wellness-inspired idea, take a look at our popular gelatin trick method that many readers find surprisingly practical.” Misconceptions About the Horse Salt Trick As with many viral ideas, the Horse Salt is sometimes misunderstood. Clearing up these misconceptions helps keep the technique grounded in realistic expectations. It Is Not a Magic Formula Some people assume the Horse Salt Trick provides instant results or dramatic changes. In reality, it is simply a method of seasoning thoughtfully. More Salt Is Not Better The essence of the Horse Salt Trick lies in restraint. Using too much salt can overwhelm a dish and mask its natural flavors. It Is Not Limited to One Type of Recipe Although the name suggests a specific origin, the Horse Salt Trick can be applied to a wide range of dishes, from simple snacks to elegant meals. Scientific Perspective on Salt Usage From a culinary science viewpoint, salt interacts with food in several ways. It draws out moisture, enhances aroma, and modifies texture. The Horse Salt uses these properties intentionally, encouraging cooks to pay attention to how salt behaves during preparation. Experts often emphasize that most diets already contain sufficient sodium, so moderation remains important. Viewing the Horse Salt Trick as a flavor technique rather than a health shortcut helps maintain balance. “If you’re curious about how mineral salts interact with fasting, you may also enjoy exploring our detailed pink salt fasting guide.” A Simple Recipe Inspired by the Horse Salt Trick If you want to experiment with the Horse Salt , try this refreshing citrus drink that demonstrates how a small pinch of salt can elevate flavor. Citrus Balance Refresh Ingredients Steps This recipe captures the spirit of the Horse Salt by focusing on subtle enhancement rather than strong seasoning. Cultural Appeal of the Horse Salt Trick Part of the charm of the Horse Salt lies in its storytelling. People enjoy techniques that connect modern kitchens to traditional practices. The name itself creates curiosity, while the simplicity of the method makes it easy to remember. As food culture evolves, the Horse Salt Trick continues to inspire creative adaptations. Some cooks

Horse Salt Trick: The Viral Kitchen Method Explained With Origins, Uses, and Practical Tips Read More »