Ginger Shot Recipe: A Powerful Homemade Wellness Drink for Daily Energy
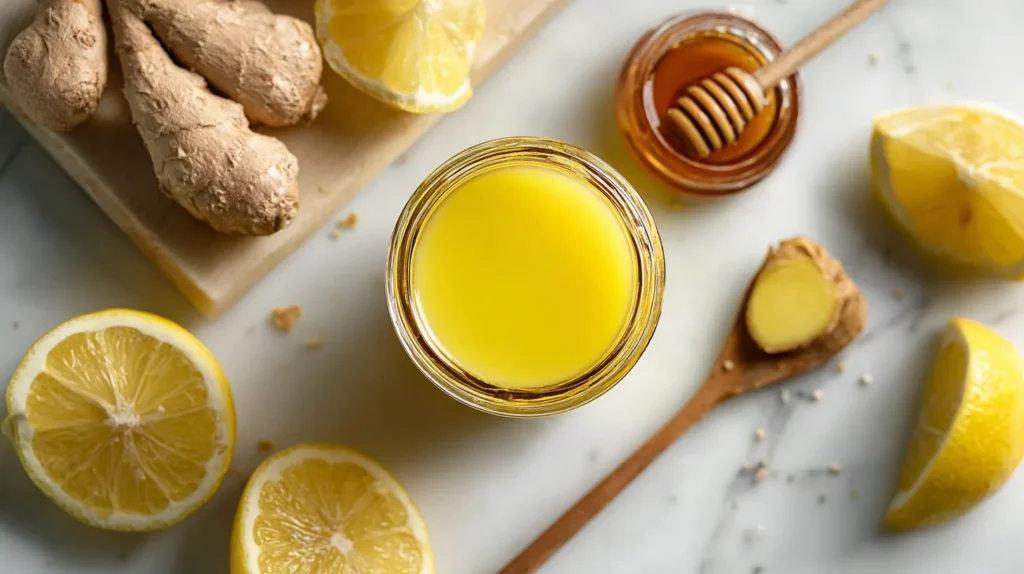
If you are looking for a simple yet powerful way to boost your health naturally, this ginger shot recipe is exactly what you need. Small in size but incredibly potent, ginger shots have become a daily ritual for people who want to improve their immunity, digestion, and overall energy levels. Made with fresh ginger root and combined with citrus juice and optional superfoods, this drink delivers a concentrated dose of nutrients in just one sip. The best part is that this ginger shot recipe can easily be prepared at home with minimal ingredients and effort. In this complete guide, you will learn how to prepare the perfect ginger shot, along with its benefits, variations, and expert tips. What Is a Ginger Shot? A ginger shot is a concentrated drink made primarily from fresh ginger root. It is typically mixed with lemon juice, orange juice, or other natural ingredients to balance its strong and spicy flavor. Unlike traditional juices, a ginger shot is consumed in small quantities, usually between 30 and 60 ml. The purpose of this ginger shot recipe is to deliver a quick and effective boost of nutrients rather than a large beverage. This makes it an ideal addition to a healthy daily routine. Why This Ginger Shot Recipe Is So Popular The growing popularity of this ginger shot recipe is due to its simplicity and powerful health benefits. Supports Immunity Ginger contains antioxidants that help strengthen the body’s natural defenses. Improves Digestion It stimulates digestive enzymes and helps reduce bloating and discomfort. Anti-Inflammatory Properties Regular intake may help reduce inflammation in the body. Natural Energy Boost This ginger shot recipe provides a refreshing start to the day without relying on caffeine. Ingredients for the Perfect Ginger Shot Recipe To prepare a balanced and effective ginger shot recipe, you only need a few fresh ingredients. Main Ingredients Optional Ingredients These ingredients help enhance both flavor and nutritional value. Step-by-Step Ginger Shot Recipe This ginger shot recipe is quick and easy to prepare. Step 1: Prepare the Ginger Wash and peel the ginger, then cut it into small pieces. Step 2: Juice the Citrus Squeeze fresh lemon and orange juice and remove any seeds. Step 3: Blend the Ingredients Combine ginger, citrus juice, and water in a blender. Blend until smooth. Step 4: Strain the Mixture Use a fine strainer or cheesecloth to extract the liquid and remove the pulp. Step 5: Store Properly Transfer the liquid into a glass bottle and refrigerate. Step 6: Serve Drink a small portion daily. This ginger shot recipe is best consumed fresh. Tips to Improve Your Ginger Shot Recipe To get the best results from your ginger shot recipe, follow these tips: Consistency is key when using this ginger shot recipe as part of your routine. Variations of Ginger Shot Recipe One advantage of this ginger shot recipe is its flexibility. Lemon Ginger Version A simple combination of ginger and lemon for a clean, refreshing taste. Ginger Turmeric Version Adding turmeric increases anti-inflammatory benefits. Spicy Ginger Version Cayenne pepper gives an extra kick and supports metabolism. Sweet Ginger Version Honey softens the strong flavor. Green Ginger Version Adding apple or greens enhances nutritional value. Each variation keeps the base of the ginger shot recipe while offering a unique twist. Health Benefits of This Ginger Shot Recipe This ginger shot recipe provides multiple health benefits when consumed regularly. Boosts Immunity The combination of ginger and citrus helps protect the body from illness. Aids Digestion It promotes better digestion and reduces discomfort after meals. Reduces Inflammation Natural compounds in ginger help reduce inflammation. Supports Detoxification This ginger shot recipe supports the body’s natural cleansing processes. Improves Circulation Ginger helps stimulate blood flow and overall vitality. For something lighter and uplifting, discover our Sunjoy drink, a perfectly balanced and refreshing beverage. Best Time to Take a Ginger Shot To maximize the benefits of this ginger shot recipe, timing is important. Many people include this ginger shot recipe as part of their morning routine. If you’re looking for another natural health boost, try our natural Mounjaro recipe, a refreshing and trending drink. Storage and Shelf Life To maintain freshness: You can also freeze portions of this ginger shot recipe for longer storage. For a warm and soothing option, explore our clove tea recipe, a comforting blend perfect for daily wellness. Possible Side Effects Although this ginger shot recipe is natural, moderation is essential. Always listen to your body when consuming this gingerr shot recipe regularly. Frequently Asked Questions How often should I drink it? Once daily is generally enough. Can I make it without a blender? Yes, by grating and squeezing the ginger manually. Can I freeze it? Yes, freezing works well for storage. Is it good for weight loss? This gingerr shot recipe may support metabolism but should be combined with a healthy lifestyle. Final Thoughts This gingerr shot recipe is one of the easiest and most effective ways to introduce a healthy habit into your daily routine. With just a few natural ingredients, you can create a powerful drink that supports immunity, digestion, and energy. Simple to prepare and highly beneficial, this gingerr shot recipe proves that small changes can have a big impact on your overall well-being. This article is thoughtfully inspired by insights from trusted sources
Ginger Shot Recipe: A Powerful Homemade Wellness Drink for Daily Energy Read More »