Grapefruit Pie – A Creamy Citrus Dessert That Feels Fresh and Elegant
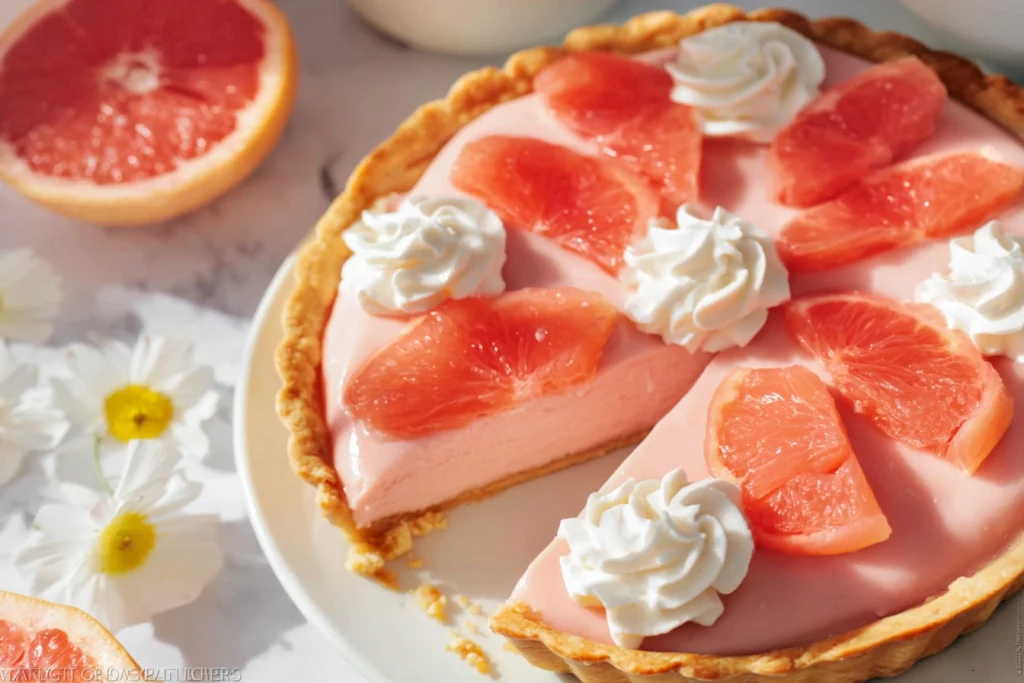
If you’re looking for a dessert that is both refreshing and sophisticated, grapefruit pie is a beautiful choice. This creamy citrus pie combines the bright flavor of fresh grapefruit with a smooth custard filling and a buttery crust. The result is a dessert that feels light yet indulgent, perfect for warm weather or special occasions. Many bakers compare grapefruit pie to classic citrus custard pies because of its silky texture. However, the flavor is unique. Grapefruit brings a gentle tartness with subtle sweetness, creating a balanced dessert that never feels overwhelming. Whether served at brunch, after dinner, or during a celebration, this recipe delivers a refined experience that stands out from traditional pies. Why Grapefruit Pie Is Becoming a Favorite Dessert Citrus desserts have always been popular, but grapefruit pie offers something slightly different. Instead of the intense sourness of lemon, grapefruit provides a softer citrus note that feels elegant and modern. One reason this recipe works so well is its simplicity. The filling requires only a few ingredients, yet the texture turns out rich and creamy. The natural acidity of grapefruit helps thicken the custard, giving the pie a smooth consistency without complicated techniques. Another advantage is versatility. Grapefruit pie can be dressed up with whipped cream, fresh fruit, or even a light meringue topping, making it suitable for both casual and formal settings. Ingredients You’ll Need Creating a perfect grapefruit pie starts with fresh, high-quality ingredients. Using real grapefruit juice instead of bottled juice enhances both flavor and texture. For the Crust For the Filling These ingredients combine to create the signature creamy filling that makes grapefruit pie so appealing. Optional Garnishes Step-by-Step Instructions Prepare the Crust Preheat your oven to 350°F (180°C). Place the crust in a pie dish and bake it briefly until lightly golden. Pre-baking helps prevent the base from becoming soggy once the filling is added. Mix the Filling In a mixing bowl, whisk together the condensed milk and egg yolks until smooth. Add the grapefruit zest, then slowly pour in the fresh juice while whisking gently. You’ll notice the mixture thickening slightly as the citrus reacts with the milk. Bake the Pie Pour the filling into the warm crust and bake until the edges are set while the center remains slightly soft. This gentle baking process allows grapefruit pie to develop its creamy custard texture. Chill Before Serving Let the pie cool completely, then refrigerate it for several hours. Chilling is essential because it helps the filling firm up and improves the flavor. The Secret Behind the Creamy Texture The magic of grapefruit pie lies in the balance between acidity and richness. When citrus juice combines with condensed milk, the proteins naturally begin to thicken. Egg yolks then stabilize the mixture during baking, creating a smooth custard that holds its shape. Unlike heavy cream-based desserts, this pie feels light while still delivering a satisfying bite. The result is a texture that is both silky and refreshing, making grapefruit pie a wonderful alternative to richer cakes or pastries. ✨ If you enjoy light and airy desserts, you may also love our cloud cake recipe, a soft and delicate treat perfect for citrus lovers. Expert Tips for Success Choose the Right Grapefruit Pink or red grapefruit tends to be sweeter, while white grapefruit has a stronger tangy flavor. Both work beautifully, depending on your preference. Zest First Always zest the fruit before juicing. This ensures you capture the aromatic oils that enhance the pie’s flavor. Avoid Overbaking The center should still jiggle slightly when you remove the pie from the oven. It will continue to set as it cools. Chill Long Enough For the best slices, allow grapefruit pie to chill overnight. This step makes a big difference in texture and presentation. ✨ For a richer bakery-style flavor, try our pistachio loaf, a moist and nutty dessert that pairs beautifully with fresh fruit pies. Creative Variations One of the reasons grapefruit pie is so popular is its adaptability. Small changes can create entirely new flavor experiences. Meringue Topping Adding a soft meringue layer brings extra sweetness and visual appeal. The airy texture contrasts beautifully with the creamy filling. Graham Cracker Crust A graham crust introduces a subtle crunch and enhances the dessert’s sweetness, making it especially appealing for those who prefer milder citrus flavors. Mixed Citrus Version Combining grapefruit with lemon or lime juice creates a brighter, more complex taste while keeping the classic custard texture. ✨ Looking for a refreshing drink to serve alongside this dessert? Our peach iced tea is a bright and cooling option that complements sweet citrus flavors perfectly. Serving Ideas Presentation plays an important role in how grapefruit pie is enjoyed. Because of its delicate color and smooth surface, simple garnishes often work best. This dessert pairs beautifully with tea, light coffee, or sparkling water, making it ideal for afternoon gatherings. Storage and Make-Ahead Tips Grapefruit pie stores well in the refrigerator for several days when covered tightly. If you plan to prepare it ahead of time, wait to add toppings until just before serving so they stay fresh. You can also freeze the pie without garnish. Wrap it securely, then thaw in the refrigerator overnight before decorating. Frequently Asked Questions Does grapefruit pie taste too tart? Not at all. The sweetness of the filling balances the natural bitterness of grapefruit, resulting in a smooth and pleasant flavor. Can I use bottled grapefruit juice? Fresh juice is recommended because it provides brighter flavor and helps the filling set properly. Is grapefruit pie similar to other citrus pies? Yes, it shares a creamy texture with classic citrus custard pies but offers a more subtle and sophisticated taste. Final Thoughts Grapefruit pie is a refreshing dessert that blends simplicity with elegance. Its creamy filling, delicate citrus flavor, and beautiful presentation make it a wonderful addition to any dessert table. Whether you’re baking for a family dinner or a special celebration, this pie delivers a unique twist on traditional citrus recipes. Once
Grapefruit Pie – A Creamy Citrus Dessert That Feels Fresh and Elegant Read More »